IS-CAT Pro Dashboard allows users to view system compliance to the CIS Benchmarks over a period of time with dynamic reporting features. CIS-CAT Pro Dashboard displays CIS-CAT result scoring for target systems in an easy-to-read graph format.
Introduction
Dashboard Use Case
CIS-CAT Pro Dashboard best fits a single, small to medium size enterprise with a moderate amount of configuration result data. Defining “moderate” data amount depends on how many endpoints an organization has and how often those results are imported into the Dashboard. Dashboard is not designed for “big data” where organizations wish to import reports from, for example, 10,000 endpoints. We recommend seeking other data viewing tools specializing in big data handling should your organization need to view consolidated data for 1,000’s of endpoints. Members importing less than 1,000 reports monthly to a single Dashboard instance may have a better performance experience. For example, when an organization has 10,000 reports already stored in the database, additional imports will be slower. Members are encouraged to consider how Dashboard can best be utilized to support configuration state viewing and remediation efforts.
Some Members have found that multiple Dashboard installations representing each domain within their organization works well. There is no license limit to installing instances of Dashboard. However, CIS tests the Dashboard with the single enterprise with moderate data in mind.
Main Features
- View average configuration assessment score in graphical format by:
- Overall systems
- CIS Benchmark
- Tagged systems
- Drill down to individual configuration assessment results
- View assessments results by CIS Critical Security Controls
- Navigate from a high level graphical overview of environmental compliance with CIS Benchmarks to individual assessment results that produce a compliance score
- Perform on-demand, remote configuration assessment against a single, remote target system
- Create exceptions to failed results and rescore overall averages
- Custom tag systems for easier exception application or overall compliance average grouping in graphical format
Diagrams
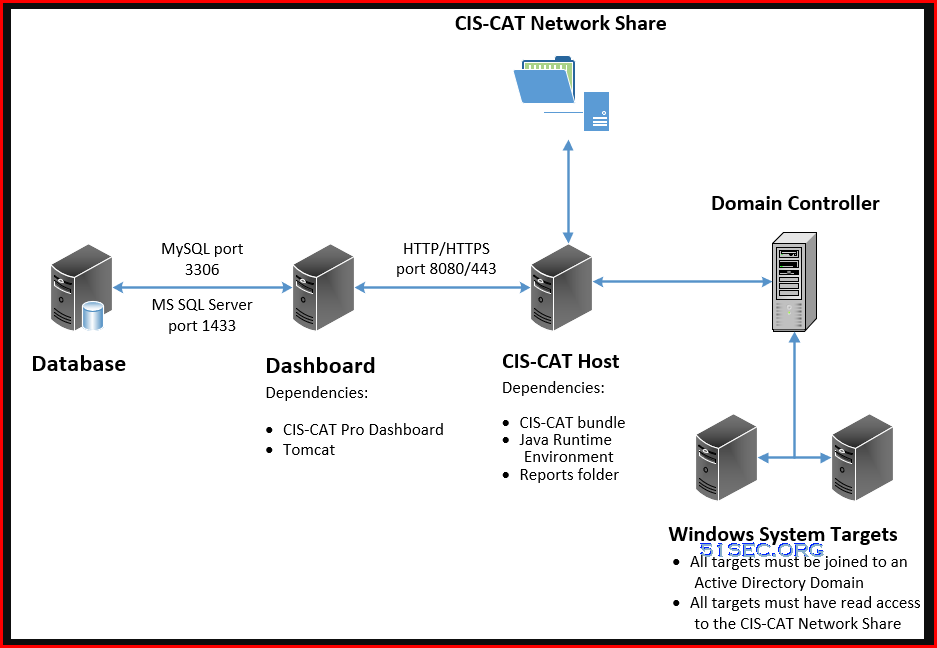
Network architecture for CIS-CAT Pro Assessor and CIS-CAT Pro Dashboard centralized scan integration in a Windows environment
Remote Assessments
In-Network Centralized Assessments
Requirements
Server
- A single Microsoft Windows Server 2016 or 2019
- 64 bit
- 8GB RAM
- Minimum 10 GB free disk space allocated to the main OS drive (usually the c:\ drive)
- 2 vCPUs, 4 cores each
Traffic and Ports
- Port 3306 is available for Maria database installation
- Traffic allowed on port 8080 (HTTP) and 443(HTTPS)
- As needed, if installed on AWS, AWS security group must allow traffic on port 8080/443
- As needed, add an inbound rule in Windows firewall
- If HTTPS communication protocol selected, traffic allowed on 443
Steps
Remote Assessments Steps - WinRM
Implementation Steps:
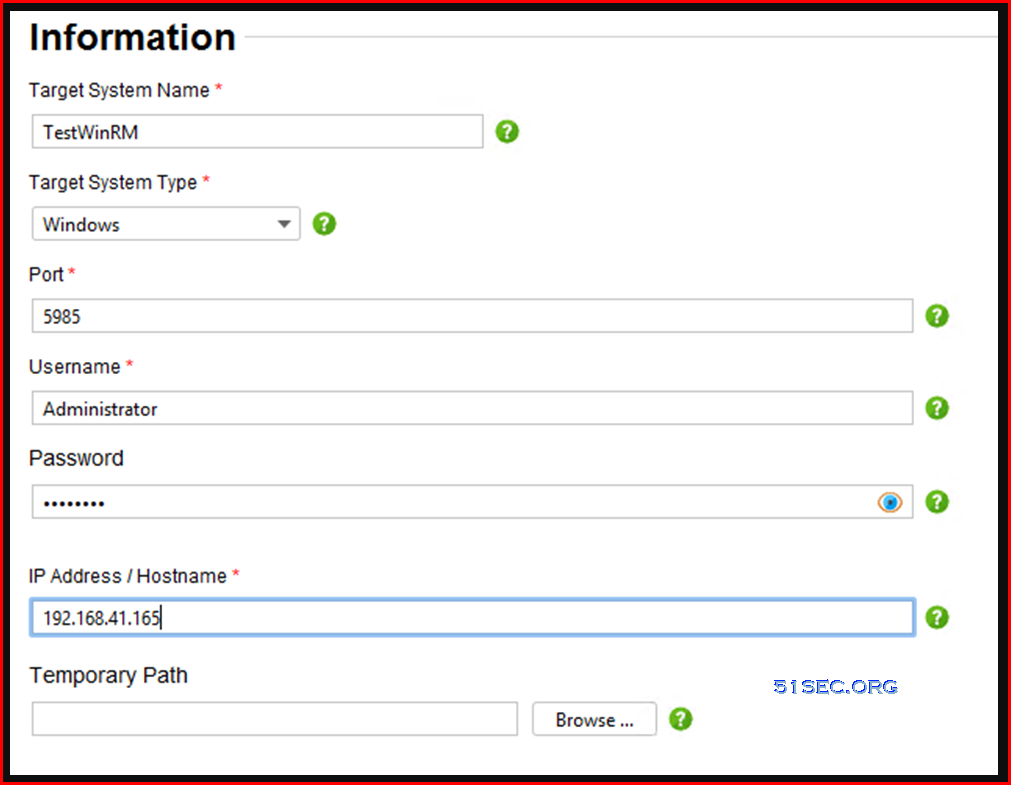
On the assessment target system (192.168.41.165)
Check and if necessary configure firewall rules to allow for incoming WinRM (TCP 5985) and SMB (TCP 445) from your CIS-CAT Server system.
Allow and confirm remote access to the machine for management with the command;
winrm quickconfig
On CIS-CAT Server system
Add the assessment target IP address to WinRM trusted hosts with this command;
Set-Item WSMan:\localhost\Client\TrustedHosts -Value 192.168.41.165
Run the CIS-CAT Pro Assessor GUI
Select Advanced > Add remote or local target system
Fill out the Information to the required fields;
Select the correct Benchmark and Profile for the Target system and click Add
Click Save
Click Test connection(s) to Targets and you should see output with a line saying Test Successful
Click on Next > Select a Report Output option > Next > Start Assessment
Troubleshooting Steps
On the Target system
Check to make sure WinRM is enabled and running on port 5985;
winrm enumerate winrm/config/listener
Check that SMB2 is running;
Get-SmbServerConfiguration | Select EnableSMB2Protocol
On the CIS-CAT server:
Check that the target system IP is in Trusted Hosts;
Get-Item WSMan:\localhost\Client\TrustedHosts
Check to see you can connect to the target host IP on ports 5985 and 445;
Test-NetConnection -ComputerName 192.168.41.165 -Port 5985 -InformationLevel Detailed
Test-NetConnection -ComputerName 192.168.41.165 -Port 445 -InformationLevel Detailed
Check to see you can connect to the target host IP on the WinRM service;
Test-WSMan -computername 192.168.41.165 -credential Administrator -Authentication negotiate
Centralized Assessor Workflow for Windows Steps
Implementation Steps
Create directory C:\CIS
Create directory C:\CIS\Reports
Open file explorer > right click on C:\CIS directory > Properties > Sharing > Share > Select the appropriate users > Share > Done > Apply. Make a note of the Network Path for later
Extract CIS-CAT-Assessor-v4.18.0.zip to C:\CIS\ directory
Extract your downloaded license.zip file to CIS\Assessor\license\ directory
Copy C:\CIS\Assessor\misc\Windows\cis-cat-centralized.bat to C:\CIS\
Copy C:\Program Files\Java directory to C:\CIS\ and rename it to Java64
Copy C:\Program Files (x86)\Java directory to C:\CIS\
Change the directory name of C:\CIS\Java64\jre.version.number\ to C:\CIS\Java64\jre\
Change the directory name of C:\CIS\Java\jre.version.number\ to C:\CIS\Java\jre\
Open C:\CIS\cis-cat-centralized.bat in a text editor and in the line
SET NetworkShare=replace NETWORK_SHARE with the Network Path from step 3 e.g. \\hostname\CIS
Open a CMD prompt as Administrator and run C:\CIS\cis-cat-centralized.bat
Videos
References
- CIS-CAT Pro Dashboard Document Library
- CIS Service Desk
- Quick Start Guides
- https://cis-cat-pro-dashboard.
readthedocs.io/en/stable/ source/Dashboard%20Deployment% 20Guide%20for%20Windows/ - CIS-CAT Pro Dashboard
- Scaling Centralized Scanning - Member Method
- Network diagram for centralized scan setup
- Quick Start Guide: CIS-CAT Centralized Workflow for Windows
- https://ccpa-docs.readthedocs.
io/en/latest/ - https://cis-cat-pro-dashboard.
readthedocs.io/en/stable/ source/Dashboard%20User%27s% 20Guide/ - CIS-CAT Pro Assessor Configuration Guide


No comments:
Post a Comment