AutoIT is basically a way of automating stuff in the windows GUI and has lots of uses.
Here is an working launcher and example script for SSMS with SQL Authentication since ssms.exe >v.18.0 no longer supports command line
arguments. All steps:
- Install AUTO IT on to the RDS server
- Create attached scrtipt and compile into an executable
- Create security template and custom launcher to pass credentials and host information to the AutoIt script executable.
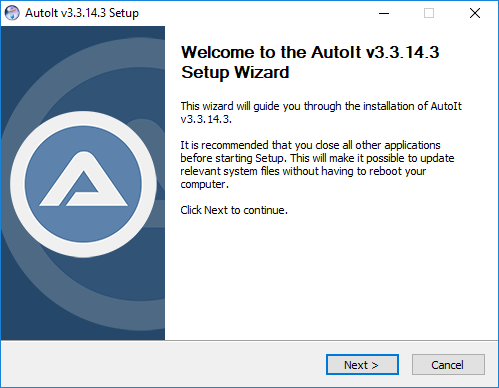
Install AutoIt
Download url : https://www.autoitscript.com/site/autoit/downloads/
Create and Compile AutoIt Script
Below is the example script to launch SSMS.exe and complete SQL Auth :
;Thycotic ssms.exe with sql credential launcher script

;set filepath of ssms.exe
$Path = "C:\Program Files (x86)\Microsoft SQL Server Management Studio 18\Common7\IDE\Ssms.exe"

;execute ssms.exe
ShellExecute($Path)

;Wait for the 'connect to server' window to appear
WinWaitActive("Connect to Server", "", 0)

;set auth mode to SQL authenticaiton
ControlSend("Connect to Server" , "" , "[NAME:comboBoxAuthentication]", "[NAME:SQL]")

;set server instance to servername passed from Secret Server launcher in cmd line parameter 1
ControlSetText("Connect to Server", "", "[NAME:serverInstance]", $CmdLine[1],1)

;set username to username passed from Secret Server launcher in cmd line parameter 2
ControlSetText("Connect to Server", "", "[NAME:userName]", $CmdLine[2],1)

;set password to password passed from Secret Server launcher in cmd line parameter 3
ControlSetText("Connect to Server", "", "[NAME:password]", $CmdLine[3],1)

;reactivate the connect to server window, required for the click of buttons within the window
WinActivate ("Connect to Server")

;click the connect button
ControlClick("Connect to Server", "", "[NAME:connect]")
Compile (go to Tools on toolbar and select Compile)
Save .exe to a location accessible to all users
(c:\autoit in my case)
Create Launcher
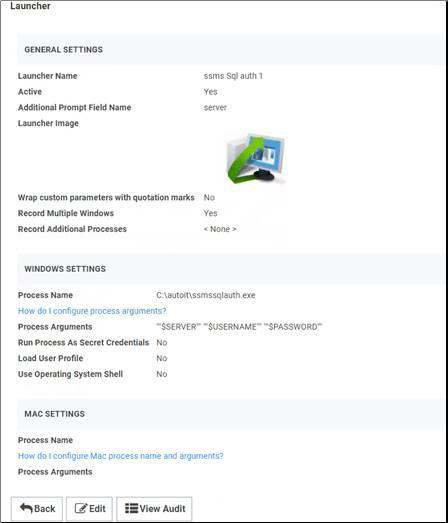
You can configure SS with custom launchers to run arbitrary programs, which can then be recorded by session recording. To do so:
Define a custom launcher:
Go to Admin > Secret Templates > Configure Launchers. The Manage Launcher Types page appears.
Click the New button.
Leave the Launcher Type dropdown list set to Process.
Type a name for the custom launcher in the Launcher Name text box.
Type a process name in the Process Name text box.
(optional) Type process arguments in the Process Arguments text box.
Customize other Options as needed.
Click the Save button.
Associate the launcher with a secret template:
- Go to Admin > Secret Templates. The Manage Secret Templates page appears.
- Click the template dropdown list and select the desired template.
- Click the Edit button.
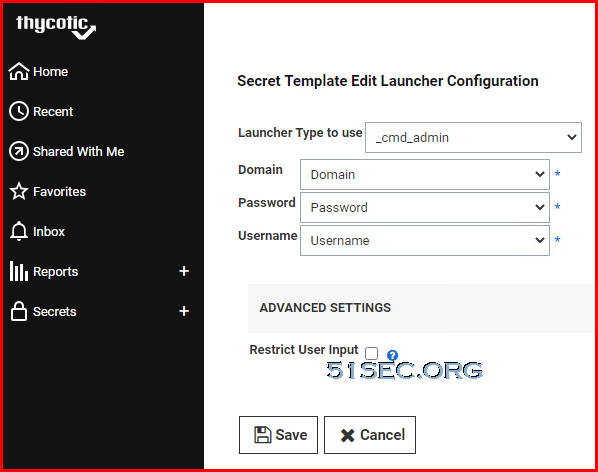
- Click the Configure Launcher button. The Secret Template Edit Launcher Configuration page appears.
- Click the Add New Launcher button.
- In the Launcher Type to use dropdown list, select your custom launcher.
- Customize any other options as needed.
Note: "Load User Profile" will need to set to Yes
Create a regular session connector launcher and use the above child launcher
Create a new secret template and pass servername, username and password.
Example 2: Custom Launcher for Application
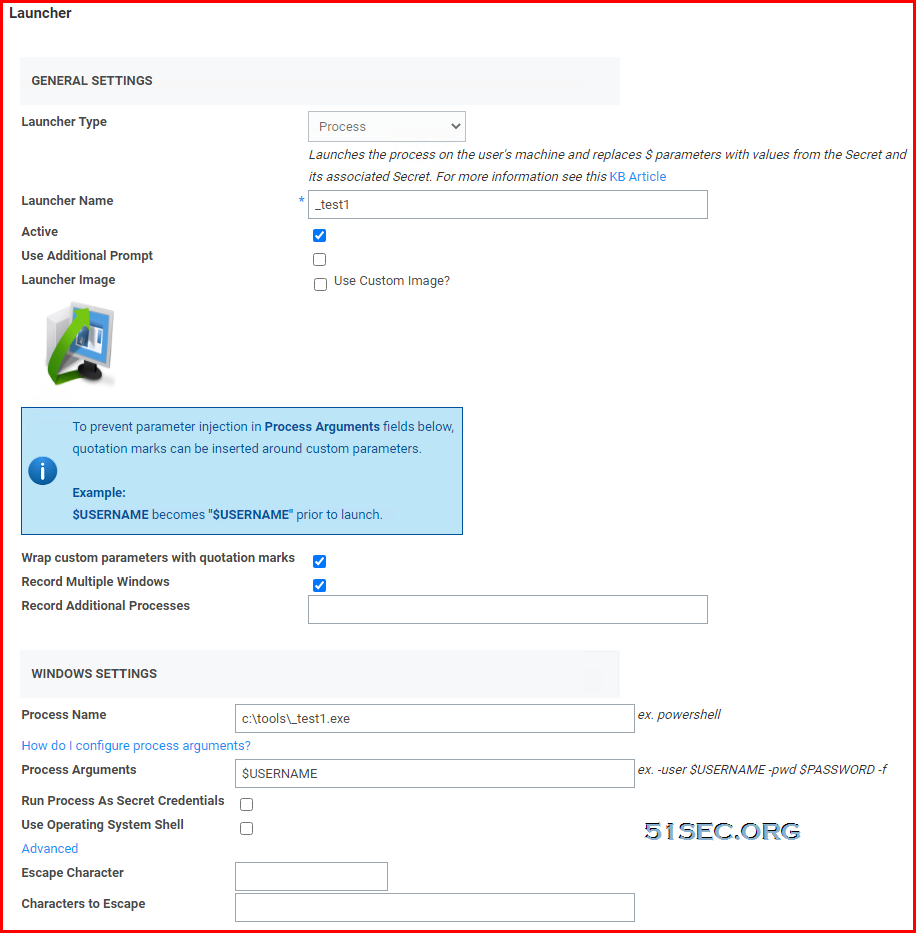
1. Create custom launcher
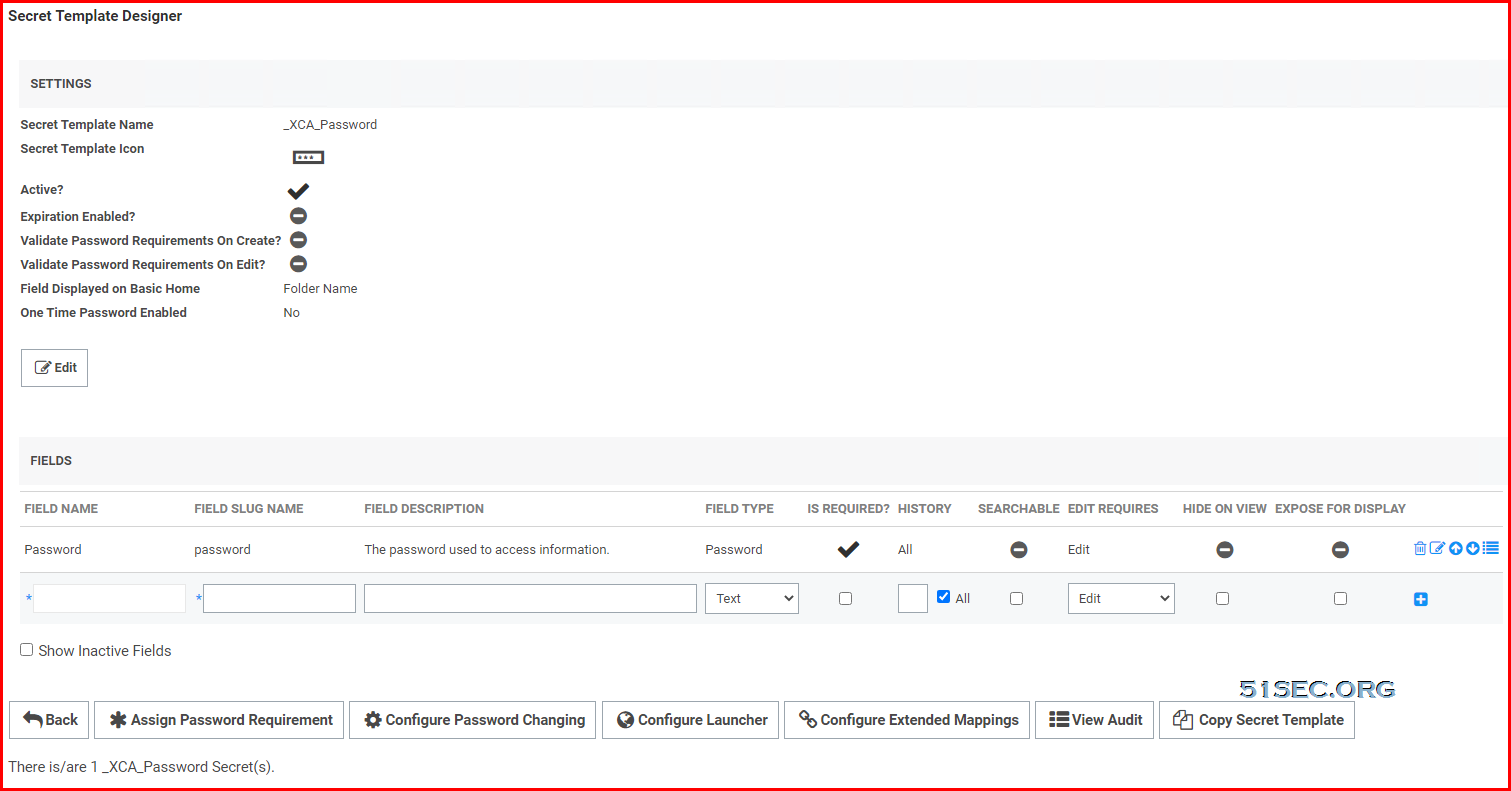
2. Create Custom Secret Template
You might need to create a custom secret template if this application's secret is unique from others. For example, in this case, there is only one field needed, password.
3. Configure Launcher
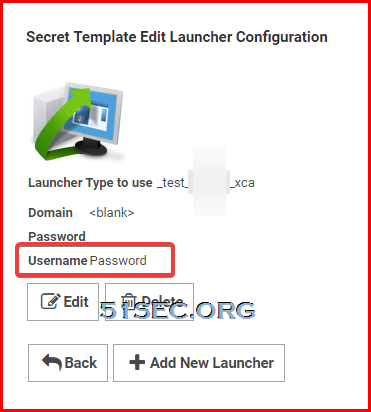
From this custom template, click button "Configure Launcher", you will get following page if you have added one new Launcher:
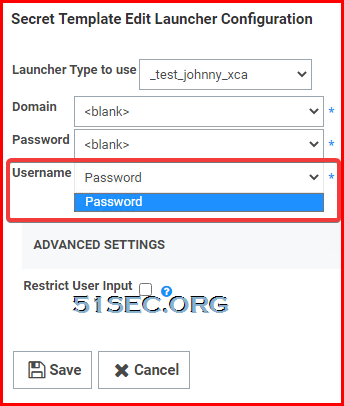
You might see a weird thing at Username field, which is mapping to Password in the secret template. That is actually because of a bug from Thycotic software. You can check it out by click "Edit" button:
There is no way to get rid of existing default mapping from username to password ( the only field in Secret Template). If there are multiple fields, we can map username to other field to avoid this weird mapping.
4. AutoIt script
You can refer the post: https://blog.51sec.org/2021/07/autoit-scripts-examples.html
Launch Local Application XCA and Autofill Password
;Thycotic xca.exe with password launcher script
;Author: Netsec
;set filepath
;$Path = "c:\tools\xca\xca.exe c:\tools\certs\xca.xdb"
$Path = "C:\tools\xca\xca.exe"
;execute xca.exe to open xdb
;ShellExecute($Path)
ShellExecute($Path, "c:\tools\certs\xca.xdb")
;Wait for the 'Password' window to appear
WinWaitActive("Password", "", 0)
;WinActivate ("Password")
;set password to password passed from Secret Server launcher in cmd line parameter 3
;ControlSetText("Password", "", "[NAME:password]", $CmdLine[3],1)
;ControlSetText("Password", "", "[NAME:password]", "Password1234")

;$value=Send($CmdLine[1])
$value=Send("Password1234")
if $value =-1 then _ThrowError("Password" & $value & " not enter correctly! Please close program and contact system admin",1) ; Exit when msgbox closed

Sleep(200)

Opt("WinTitleMatchMode",2); Windows title Match
;reactivate the connect to server window, required for the click of buttons within the window
WinActivate ("Password")
WinWaitActive("Password", "", 0)
;click the connect button
;ControlClick("Password", "", "[NAME:OK]")
Send("{Enter}")

Sleep(500)
Example to Auto-Fill Credentials into Solarwins ARM
#include <WinAPI.au3>
#include <MsgBoxConstants.au3>
;Start:
HotKeySet ("{F10}","BlockinputOff")
;Thycotic SolarWinds ARMs with password launcher script
;Author: Net Sec
;set filepath
$Path = "C:\Program Files\SolarWinds\ARM\bin\app8Man.exe"

If WinExists("ARM 2020.2.5.4920") Then
   WinClose("ARM 2020.2.5.4920")
   ;WinActivate ("ARM 2020.2.5.4920")
   MsgBox(0,"Closing ARMS window", "For Safety, Closed ARM window. Please re-run your launcher again")
   Exit
Else

   ;execute app8Man.exe to open Arms
   ShellExecute($Path)

   ;Wait for the 'Password' window to appear
   WinWaitActive("ARM 2020.2.5.4920", "", 0)

EndIf


Sleep(200)


;$value=Send($CmdLine[1])
;$value=Send("Password1234")

;if $value =-1 then _ThrowError("Password" & $value & " not enter correctly! Please close program and contact system admin",1) ; Exit when msgbox closed

;Sleep(200)

;Opt("WinTitleMatchMode",2); Windows title Match
;reactivate the connect to server window, required for the click of buttons within the window
;WinActivate ("Password")
;WinWaitActive("Password", "", 0)
;click the connect button
;ControlClick("Password", "", "[NAME:OK]")
;Send("{Enter}")

GetScreenMiddle()

;MsgBox($MB_SYSTEMMODAL, "", "Width: " & $ScreenWidth & @CRLF & "Height: " & $ScreenHeight)

Local $WinPos = WinGetPos("[ACTIVE]")
;MsgBox($MB_SYSTEMMODAL, "", "x-pos: " & $WinPos[0] & @CRLF & "y-pos: " & $WinPos[1] & @CRLF & "win width: " & @CRLF &  $WinPos[2] "win height " & $WinPos[3])
;MsgBox($MB_SYSTEMMODAL, "", "x-pos: " & $WinPos[0])
;MsgBox($MB_SYSTEMMODAL, "", "y-pos: " & $WinPos[1])
;MsgBox($MB_SYSTEMMODAL, "", "Window width: " & $WinPos[2])
;MsgBox($MB_SYSTEMMODAL, "", "Window Height: " & $WinPos[3])

;MsgBox($MB_SYSTEMMODAL, "", "Mouse move To " & $ScreenWidth/2+$WinPos[1]/2-10)
;MouseMove ($ScreenWidth/2+$WinPos[2]/2-10, $ScreenHeight/2-10, 10)

WinActivate("ARM 2020.2.5.4920")
$var1 = PixelGetColor( $ScreenWidth/2+$WinPos[2]/2-50, $ScreenHeight/2-40)
$var2 = PixelGetColor( $ScreenWidth/2, $ScreenHeight/2)
;MsgBox(0,"The middle decmial color is 2718100", $var)
;MouseMove ($ScreenWidth/2+$WinPos[2]/2-50, $ScreenHeight/2-40, 10)
;Sleep(500)
;MsgBox(0,"The middle hex color is 297994, $ScreenWidth/2+$WinPos[2]/2-10's color is 444444", Hex($var1, 6))
;MouseMove ($ScreenWidth/2, $ScreenHeight/2, 10)
;MsgBox(0,"The middle hex color is 297994, $ScreenWidth/2+$WinPos[2]/2-10's color is 444444", Hex($var2, 6))

;If it is login page (three text boxes), the var1=FFFFFF=var2. If it is AD user icon page (No text box), the var2 is 297994, var1=444444

If Hex($var1,6) = "444444" And Hex($var2,6) = "297994" Then
	  ;MsgBox(0,"AD Account Page", "This AD Account, no text box Page", 6)
   	  Send("{Tab 2}")
	  Send("{Enter}")
   Else
	  If Hex($var1,6) = "FFFFFF" and Hex($var2,6) = "FFFFFF" Then
			;MsgBox(0,"Three Textboxes Page", "This three Textboxes Page", 6)
			Send("{Tab 1}")

			;set password to password passed from Secret Server launcher in cmd line parameter 3
			;ControlSetText("Password", "", "[NAME:password]", $CmdLine[3],1)
			;ControlSetText("Password", "", "[NAME:password]", "Password1234")

			Blockinput(1)
			;$value=Send($CmdLine[1])
			$value1=Send("test1")
			;Sleep(100)
			Send("{Tab 1}")
			Sleep(100)
			;$value=Send($CmdLine[1])
			$value2=Send("password1234",1)
			;Sleep(100)
			;if $value1 =-1  or $value2 =-1 then _ThrowError("Password" & $value & " not enter correctly! Please close program and contact system admin",1) ; Exit when msgbox closed

			Send("{Enter}")

			Sleep(10500)

			If WinExists("ARM 2020.2.5.4920") Then
				  WinClose("ARM 2020.2.5.4920")
				  ;WinActivate ("ARM 2020.2.5.4920")
				  BlockInput(0)
				  MsgBox(0,"Closing ARMS window", "Logging failure, please contact your TSS sys admin!")
				  Exit
			EndIf
			BlockInput(0)

	  EndIf
EndIf


;CheckWinSize()

Func GetScreenMiddle()
   ;Global $ScreenWidth=@DesktopWidth/2
   ;Global $ScreenHeight=@DesktopHeight/2
   Local $ScreenSize=WinGetPos("Program Manager")
   Global $ScreenWidth=$ScreenSize[2]
   Global $ScreenHeight=$ScreenSize[3]


EndFunc

Func CheckWinSize()
   Local $hwnd= WinGetHandle("[ACTIVE]")
   Local $aClientSize = WinGetClientSize($hWnd)
   ;MsgBox($MB_SYSTEMMODAL, "", "Width: " & $aClientSize[0] & @CRLF & "Height: " & $aClientSize[1])
   if $aClientSize[0]<280 then
	  ;MsgBox($MB_SYSTEMMODAL, "", "Wrong Password. Width: " & $aClientSize[0] & @CRLF & "Height: " & $aClientSize[1])
	  MsgBox($MB_SYSTEMMODAL, "", "Wrong Password. Please close all XCA windows and contact system admin!")
	  ;WinClose($hWnd)
   Else
	  ;MsgBox($MB_SYSTEMMODAL, "", "Right Password. Width: " & $aClientSize[0] & @CRLF & "Height: " & $aClientSize[1])
   EndIf
EndFunc   ;


Func CheckWinClass()

   Local $hwnd= WinGetHandle("[ACTIVE]")
   if $hwnd = 0x0019081 then
	  MsgBox(4096, "Password Correct", "Password is correct!" & $hwnd)
	  ;MsgBox(4096, "Get ClassName", "ClassName of " & $hwnd & ":" & _WinAPI_GetClassName($hwnd))
   Else
	  MsgBox(4096, "Password Wrong", "Password is wrong! Please close all XCA window and contact system admin" & $hwnd)
   EndIf

EndFunc   ;

Func CheckWinTitle()
    ; Retrieve the window title of the active window.
    Local $sText = WinGetTitle("[ACTIVE]")
   if StringInStr ($sText, "Key management") AND StringInStr ($sText, "X Certificate") Then
	  MsgBox($MB_SYSTEMMODAL, "", "Wrong Password, please close all Windows and contact Thycotic System Admin!")
    ; Display the window title.
   else
	  MsgBox($MB_SYSTEMMODAL, "", $sText+"is correct!")
   EndIf
EndFunc   ;


Func _ThrowError($txt, $exit = 0, $ret = "", $err = 0, $ext = 0, $time = 0)
    If $exit = 0 Then
        MsgBox(48, @ScriptName, $txt, $time) ; Exclamation, return with error code
        Return SetError($err, $ext, $ret)
    Else
        MsgBox(16, @ScriptName, $txt, $time) ; Stop, quit after error
        Exit ($err)
    EndIf
EndFunc

Func BlockinputOff()
	  Blockinput(0)
EndFunc
;Finish
Launch CheckPoint SmartConsole
#cs ----------------------------------------------------------------------------
AutoIt Version: 3.3.14.5
Script Function: Start Checkpoint SmartConsole using Secret Server parameters (to be used alongisde Thycotic Secret Server custom launcher)
Checkpoint SmartConsole Filler.
#ce ----------------------------------------------------------------------------
run("C:\Program Files (x86)\CheckPoint\SmartConsole\R80.40\PROGRAM\SmartConsole.exe") ; Run the Thick Client program
WinWaitActive("Check Point SmartConsole") ; Wait for the program window to be active
Sleep(5000) ; Wait 5000ms (5s) to get by the splash screen
; Upon opening, the cursor defaults to the Username box so enter the username by issuing the �Send�
;command. The argument �1� is used to send the text in RAW format to cater for special characters that might
;appear in the username
Send($CmdLine[1],1)
Send("{TAB}") ; Go over to the next box by sending one TAB keystroke
Send($CmdLine[2],1) ; Enter the password
Send("{TAB}") ; Go over to the next box by sending one TAB keystroke
Send($CmdLine[3],1) ; Enter the IP address
For $i=1 to 3 ; Enter TAB 3 times to highlight the login button
 Send("{TAB}")
 Next
 send("{enter}")
 Exit
Launch CheckPoint SmartConsole
This script can be used to create a CMD or Powershell Window with a special user privilege (such as admin) without normal user to enter any credentials.
$sUser = $CmdLine[2]
$sPass = $CmdLine[3]
$sDomain = $CmdLine[1]
$sCMD = "cmd /k"
RunAs ($sUser, $sDomain, $sPass, 0, $sCMD)
.png)




No comments:
Post a Comment