Thycotic SS upgrade could be very simple, but also could be complicated if you are having multiple clustering servers, Database Mirroring configuration and remote DR clustering.
In this post, all common situations have been summarized to show the steps how to upgrade.
Pre-requisite
1. .NET Framework 4.8 Requirement
- You can run the following command at a Windows PowerShell prompt to view currently installed .NET Framework version number:
(Get-ItemProperty "HKLM:SOFTWARE\Microsoft\NET Framework Setup\NDP\v4\Full").version- SS on-premises (not SSC) displays the .NET framework version on the Admin > Diagnostics page. The version displayed is for the Web server being accessed. It does not include information about the .NET Framework version installed on any other server.
2. SS Version Check at all SS Cluster members and DR SS
3. Connection Manager upgraded to 1.6.2 version
Main Method to Upgrade Secret Server
https://docs.thycotic.com/ss/11.0.0/secret-server-setup/upgrading/upgrading-secret-server
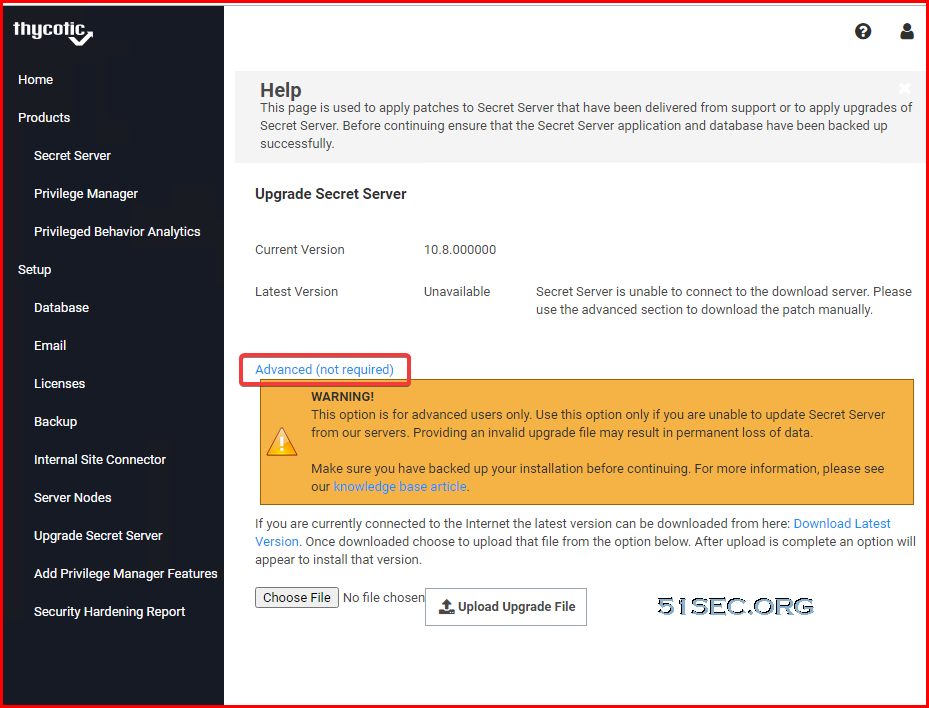
1. From a computer that has outbound network access, click on the upgrade link to go to: http://<yourinstance>/Setup/Home.
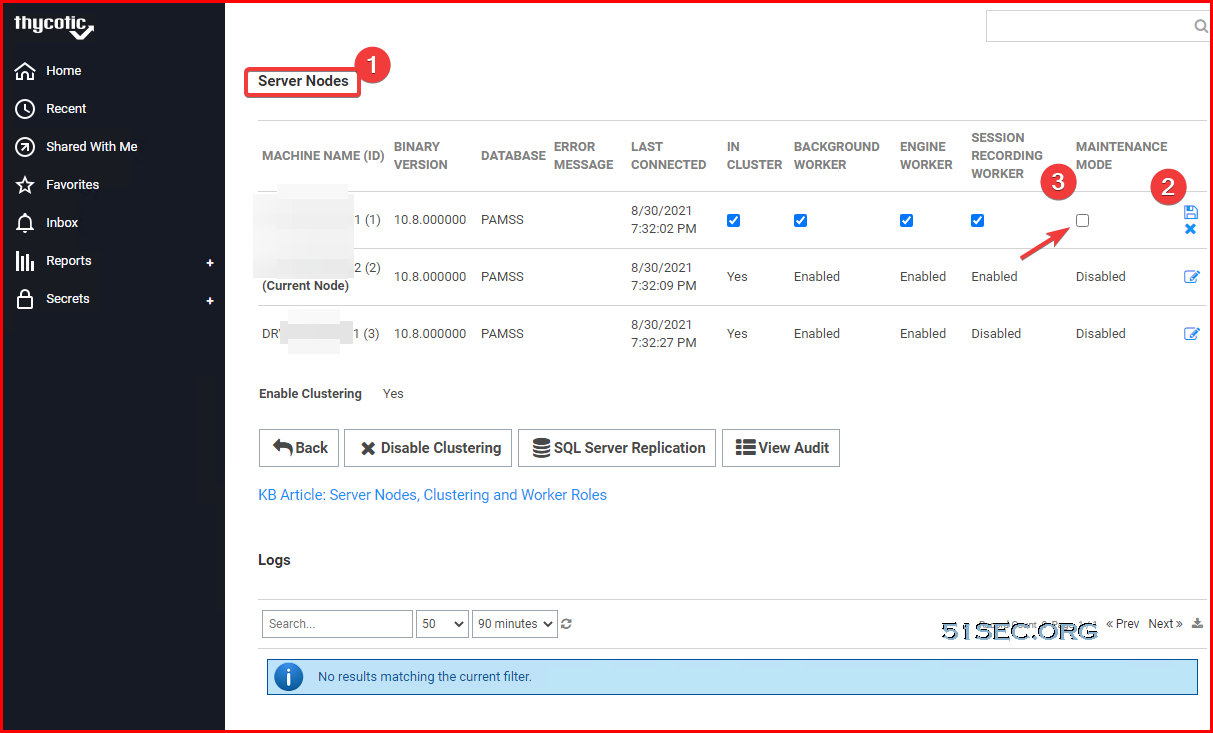
2. Enable Maintenance Mode on all SS servers including DR servers
3. Backup your all your SS's application folders.
Important: All your data is encrypted the encryption.config file in your SS application folder. Your data cannot be decrypted without it. Thus, it is critical that you make a backup of the application folder and its contents before proceeding.
4. Since your SS might not have outbound connection, check following link to get offline installation files:
https://docs.thycotic.com/ss/10.9.0/secret-server-setup/upgrading/upgrading-without-outbound-access/index.md
- https://updates.thycotic.net/secretserver/Version_10_9_000005.zip
- https://updates.thycotic.net/SecretServer/Version_10_9_000064.zip
- https://updates.thycotic.net/secretserver/getlatestversion.aspx?alwayslatest=true
SS Clustering Upgrade
https://docs.thycotic.com/ss/11.0.0/secret-server-setup/upgrading/upgrading-with-web-clustering
Before Beginning
Ensure that you have account credentials information and access for the server hosting SS and the SQL Server instance hosting your SS database.
Have a recent backup of the application files and database available.
If you use clustering, stop the application pools on all of the servers.
Upgrading a Clustered Environment
Follow the instructions in Upgrading Secret Server or Upgrading Secret Server Without Outbound Access as applicable to upgrade one server.
Once upgraded and working, copy the Web application folder (without the
database.configor theencryption.configfiles) to all secondary servers, and replace the content of the existing Web application folder with the new.If Thycotic Management Server (TMS) is installed and clustered, you need to copy the TMS directory to the secondary servers as well. The TMS directory is included by default for new installs of SS 10.2 and above. TMS is used by advanced session recording and Privilege Manager. If the TMS folder and site does not exist in IIS, then no additional actions are needed beyond copying the SS directory.
Start secondary servers and confirm they still work.
Notes:
1. EFS and DPAPI Encryption. (Not enabled by default)
When upgrading, after the initial cluster configuration, you do not need to copy the database.config or encryption.config files to the other servers. If you need to copy those files because the database configuration changed and are using DPAPI, disable DPAPI encryption in SS by going to Admin > Configuration and click Decrypt Key to not use DPAPI on the Security tab before copying those files to secondary servers.
Database Mirroring and Remote DR Upgrade
https://docs.thycotic.com/ss/11.0.0/secret-server-setup/upgrading/upgrading-with-web-clusteringUpgrading Database Mirroring
If there is more than one Web server running SS, ensure all instances are pointing to the same database. (How to ensure?)
Stop all but one of the web servers.
Perform the upgrade on that single instance.
Once upgraded and working, copy the Web application folder to all secondary servers.
Start the secondary servers, and confirm they work.
Ensure all instances are properly activated.
Ensure that the database changes have been replicated to the mirror database.
If the secondary Web server was pointing originally to the secondary database, adjust it to point back to the secondary database.
Upgrading Remote DR Instances
Perform the upgrade on one instance. (on one of main SS cluster members)
Backup that instance.
Copy the database backup to the remote DR instance.
Restore the database.
Once the instance (one of main SS cluster members) is upgraded and working, copy the Web application folder (but not the
database.configorencryption.configfiles) to the remote DR instance (overwriting the existing files).Restart IIS or recycle the application pool running SS on the remote DR instance.
Confirm that the remote DR instance is working correctly.
Manual Upgrade process for Secret Server
1. Before starting the process of upgrading Secret Server create backups of both your application files and your database. Backups of the database and the encryption.config file in the application folder are especially important, if you lose your encryption.config file there is nothing at all that we can do in support to help you fix it. You will have to re-build Secret Server from scratch. You can do this in whatever way your organization performs backups however, we do have some documentation on how to setup backups through Secret Server that can be found here:
- a. https://docs.thycotic.com/ss/11.0.0/backup-and-disaster-recovery/backup-settings
- b. https://docs.thycotic.com/ss/11.0.0/backup-and-disaster-recovery/backing-up-tonetwork-share
- c. https://docs.thycotic.com/ss/11.0.0/backup-and-disaster-recovery/common-backuperrors
2. Confirm the version of Secret Server in use on both your database and within your application directory and ensure that they are both the same.
- a. https://thycotic.force.com/support/s/article/How-to-check-Secret-Server-version-inSQL
- b. https://thycotic.force.com/support/s/article/How-to-check-Secret-Server-version-inapplication-directory
3. Use the following link to download the latest Secret Server application files:
- a. https://updates.thycotic.net/secretserver/getlatestversion.aspx?alwayslatest=true
4. Upgrading the Secret Server database
- a. Stop the Secret Server Application Pool in IIS.
- b. Open SQL Management Studio and connect to the SQL Server database engine that hosts the Secret Server database
- c. Expand Databases on the right
- d. Right-click on the Secret Server database and select New Query
- e. When the upgrade script is available, copy the contents of the upgrade script query into the New Query screen.
- f. Click the Execute button, Ctrl+E, or hit F5
5. Upgrading the application files
- a. In IIS Manager, verify that the Secret Server application pool is still Stopped
- b. Download the Secret Server Application files for the latest version from the Thycotic Customer Support Portal. You can log in and go to Downloads | Secret Server and download the zip file for the application files.
- i. You can also download the zip file directly from here:
- 1. https://updates.thycotic.net/secretserver/getlatestversion.aspx?alwayslatest=true
- c. Extract the downloaded zip file to a temporary location.
- i. You must actually extract this file, I have encountered issues where the zip file contained within didn’t work because it had been copied out of the zip rather than extracted.
- d. Extract the ss_update.zip file.
- e. Create a zip file of the existing Secret Server application folder and send it to the desktop, another backup in case things go haywire.
- f. Copy and paste the contents contained in the newly extracted ss_update folder to Secret Server’s application folder over the top of the existing application files.
- g. Once completed Start the Secret Server application pool.
- h. Open an administrative command prompt and perform an iisreset command.
- i. If you run into issues after restarting the application try the following:
- i. Stop the application pool again.
- ii. Remove all files from the Secret Server application folder (default location: C:\inetpub\wwwroot\SecretServer) except database.config and encryption.config.
- iii. Copy and paste the contents contained in the extracted ss_update folder.
- iv. Once completed Start the Secret Server application pool.
- v. Open an administrative command prompt and perform an iisreset command.
6. Check the version of Secret Server in the application files and database as shown in step two.
7. Just as a final note/warning (I know that I said this above but it is very important) always protect the encryption.config file within the application folder, there is no way to recover this file if it is lost.
Post Upgrade
Protocol Handler
Products
- Secret Server
- Secret Server Cloud
Required Action
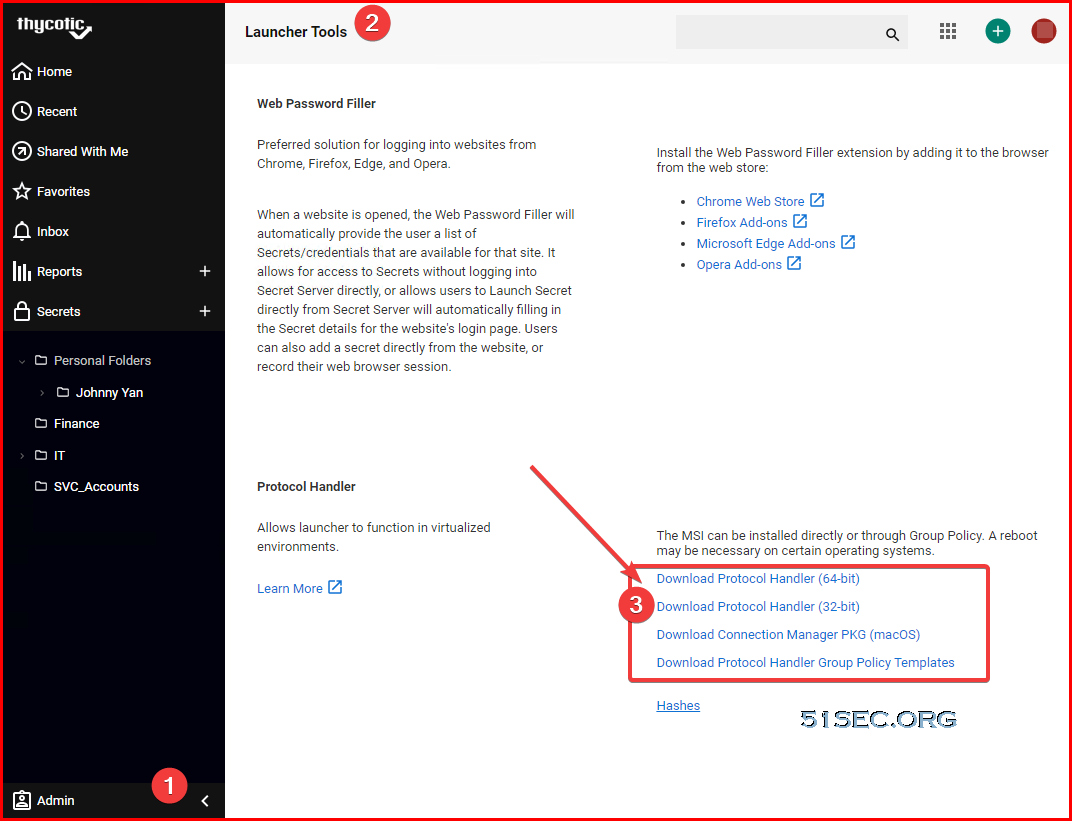
New installations of the protocol handler on Windows systems after the December release will require .NET Framework 4.8 installed.
Fully patched Windows 10 systems should already have the framework in place.
Customers with existing deployments of protocol handler have two options:
Ensure that .NET Framework 4.8 is installed on all endpoints using protocol handler before the SS or SSC update.
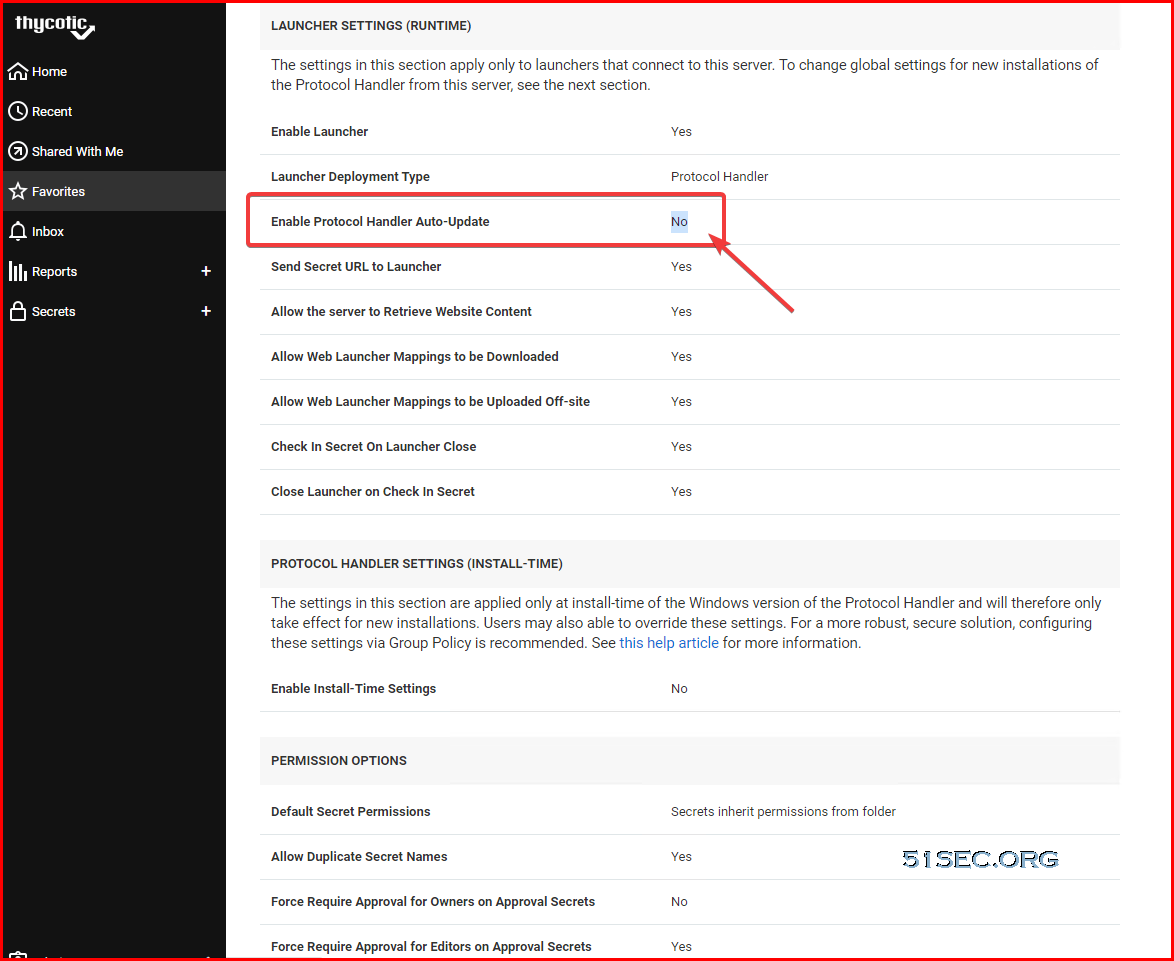
- Disable automatic updating of protocol handler:
Go to Admin > Configuration.
Set Enable Protocol Handler Auto-Update to No.
SS is compatible with older versions of protocol handler. Older versions will continue to function when used with the SS December release.
Web Password Filler
It is browser plug in, usually come with your browser upgrade process.
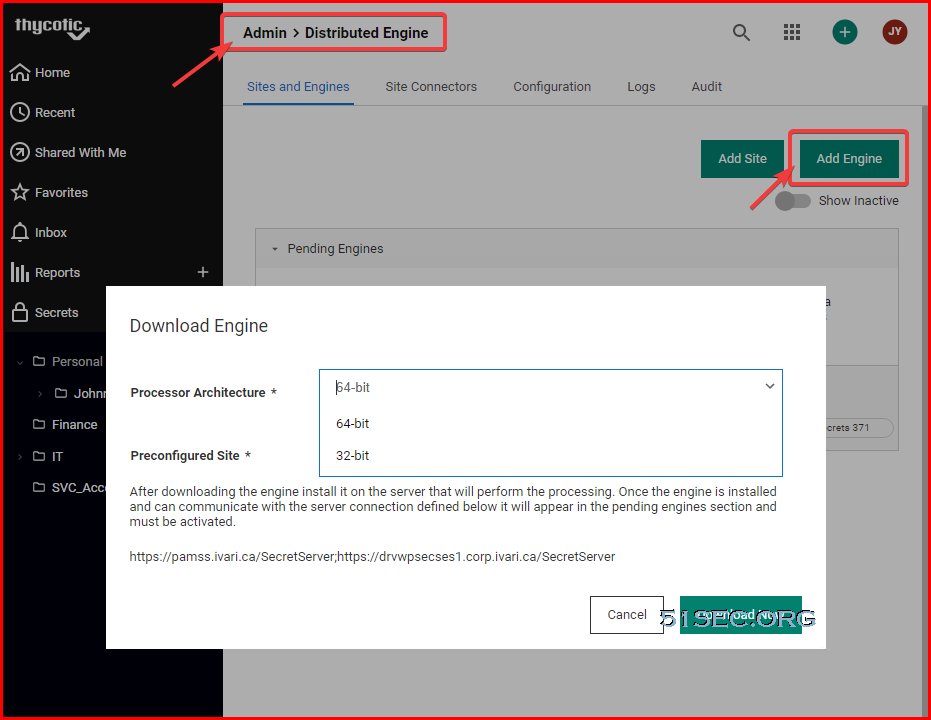
Distributed Engine
Manually upgrade process for each engine, one at time:
-> Deactivate the older DE from the GUI (Admin > Distributed Engine)
-> Download the new DE MSI file from Admin > Distributed Engine for the same site, then copy/paste this MSI file into the DE machine that you just de-activated
-> RDP into the DE machine that you just de-activated from the SS GUI
-> Paste the MSI file for the new DE
-> Go into Services -> Stop the running DE service
-> Let it Stop completely
-> Uninstall the DE from Control Panel
-> Then Re-install the New DE
-> Go back to the SS GUI and re-activate the new DE
-> Repeat the above steps for each DE
You can plan for around 30 minutes of downtime but this process can be much faster than that because the only time that is taken initially is the install/upgrade of the first DE.
Then that DE will start picking up work while you can do the upgrades of the other DEs.
The DE updates automatically after the Secret Server web app upgrade. Typically, the DE updates within 30 minutes of the Secret Server web app upgrading and supposed to be automatic.
Troubleshooting
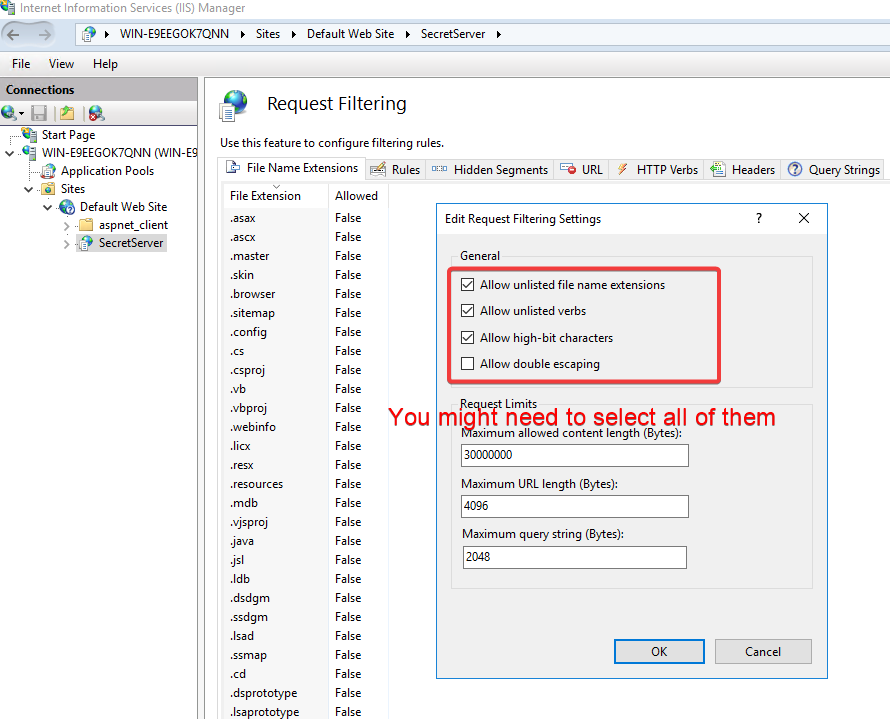
Sometimes, you might need to change following settings if you are getting problem to access website:
References
- https://docs.thycotic.com/ss/11.0.0/secret-server-setup/upgrading/upgrading-with-web-clustering
- https://docs.thycotic.com/ss/10.9.0/secret-server-setup/upgrading/upgrading-without-outbound-access/index.md
- https://docs.thycotic.com/ss/11.0.0/secret-server-setup/upgrading/upgrading-secret-server
- https://docs.thycotic.com/ss/11.0.0/secret-server-setup/upgrading/minimizing-upgrade-downtime/index.md
- https://docs.thycotic.com/ss/11.0.0/secret-server-setup/upgrading/net-4-8-upgrade


No comments:
Post a Comment