This post is to show you the methods to access your Azure Blob storages, especially under Windows.
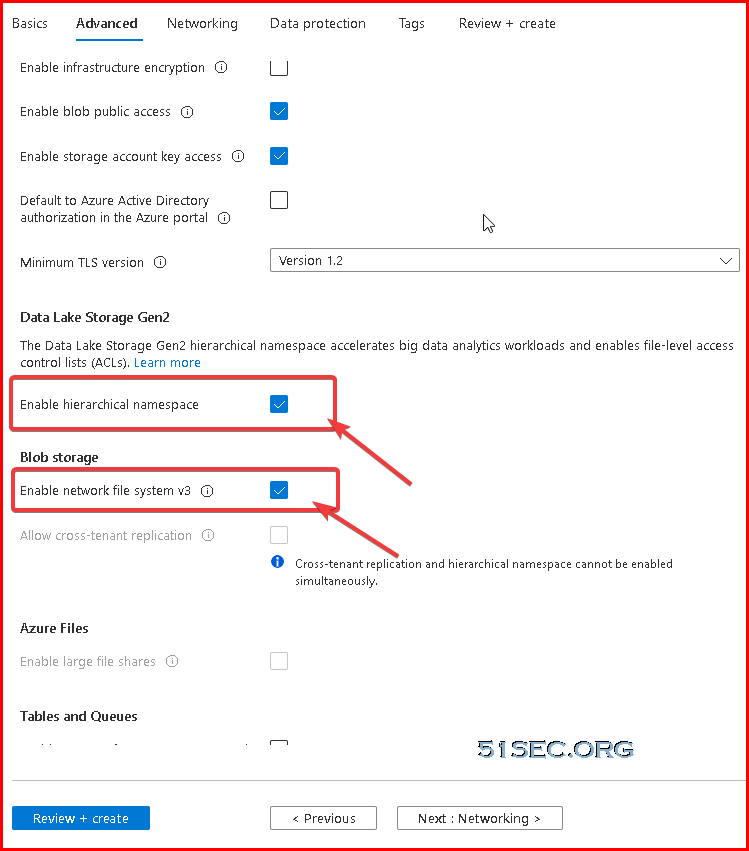
You will be able to use NFS 3.0 protocol to mount Blob storage container.
Azure Blog Storage vs Azure File Share
Azure Blob storage is useful for massive-scale, cloud-native applications that need to store unstructured data. To maximize performance and scale, Azure Blob storage is a simpler storage abstraction than a true file system. You can access Azure Blob storage only through REST-based client libraries (or directly through the REST-based protocol).
Azure Files is specifically a file system. Azure Files has all the file abstracts that you know and love from years of working with on-premises operating systems. Like Azure Blob storage, Azure Files offers a REST interface and REST-based client libraries. Unlike Azure Blob storage, Azure Files offers SMB or NFS access to Azure file shares. File shares can be mounted directly on Windows, Linux, or macOS, either on-premises or in cloud VMs, without writing any code or attaching any special drivers to the file system. You also can cache Azure SMB file shares on on-premises file servers by using Azure File Sync for quick access, close to where the data is used.
Azure Storage Explorer
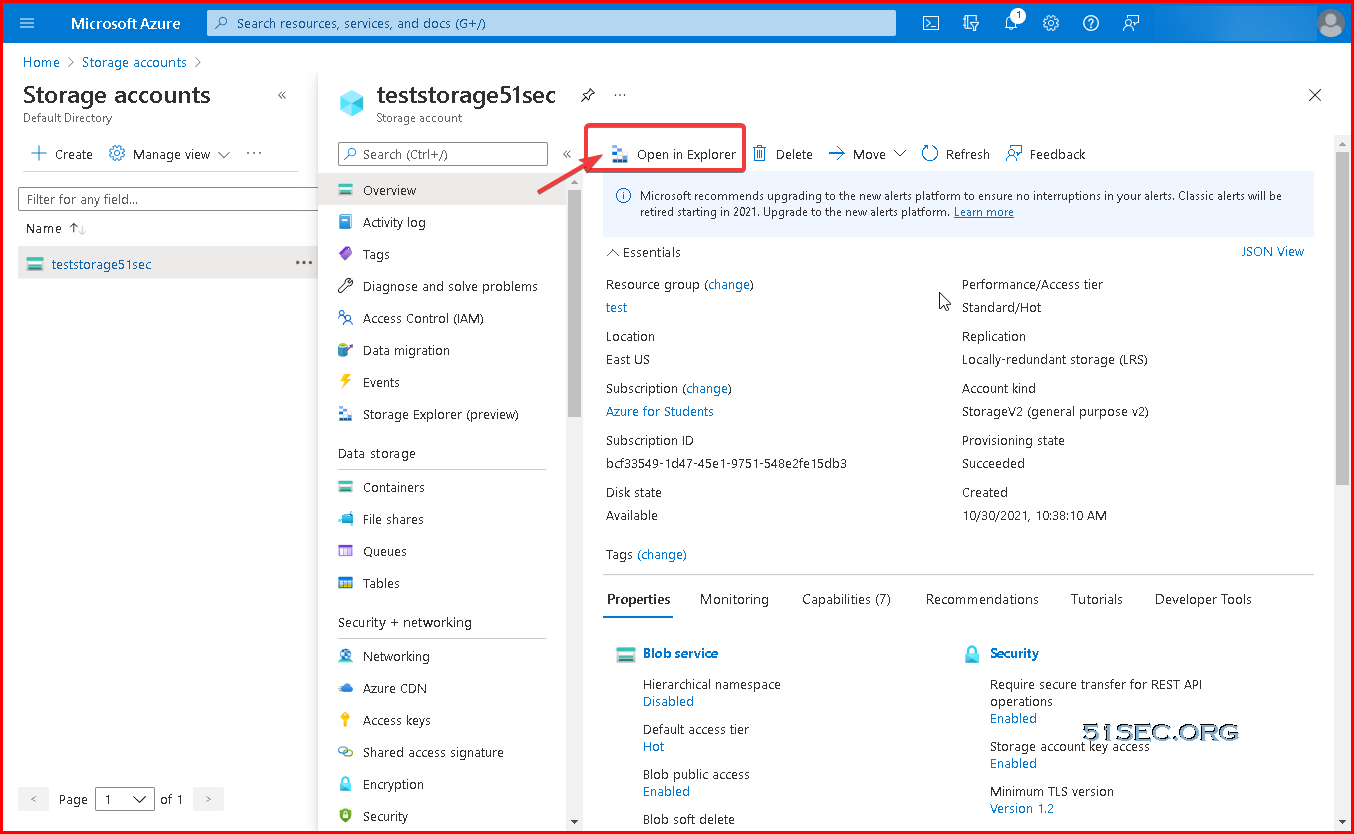
Azure Portal, from storage accounts page, you can click "Open in Explorer":
You can use Azure Storage Explorer (Free tool to easily manage your Azure cloud storage resources anywhere, from Windows, macOS, or Linux)Download link:https://azure.microsoft.com/en-in/features/storage-explorer/
More details can be found from this link: Manage Azure Blob Storage resources with Storage Explorer
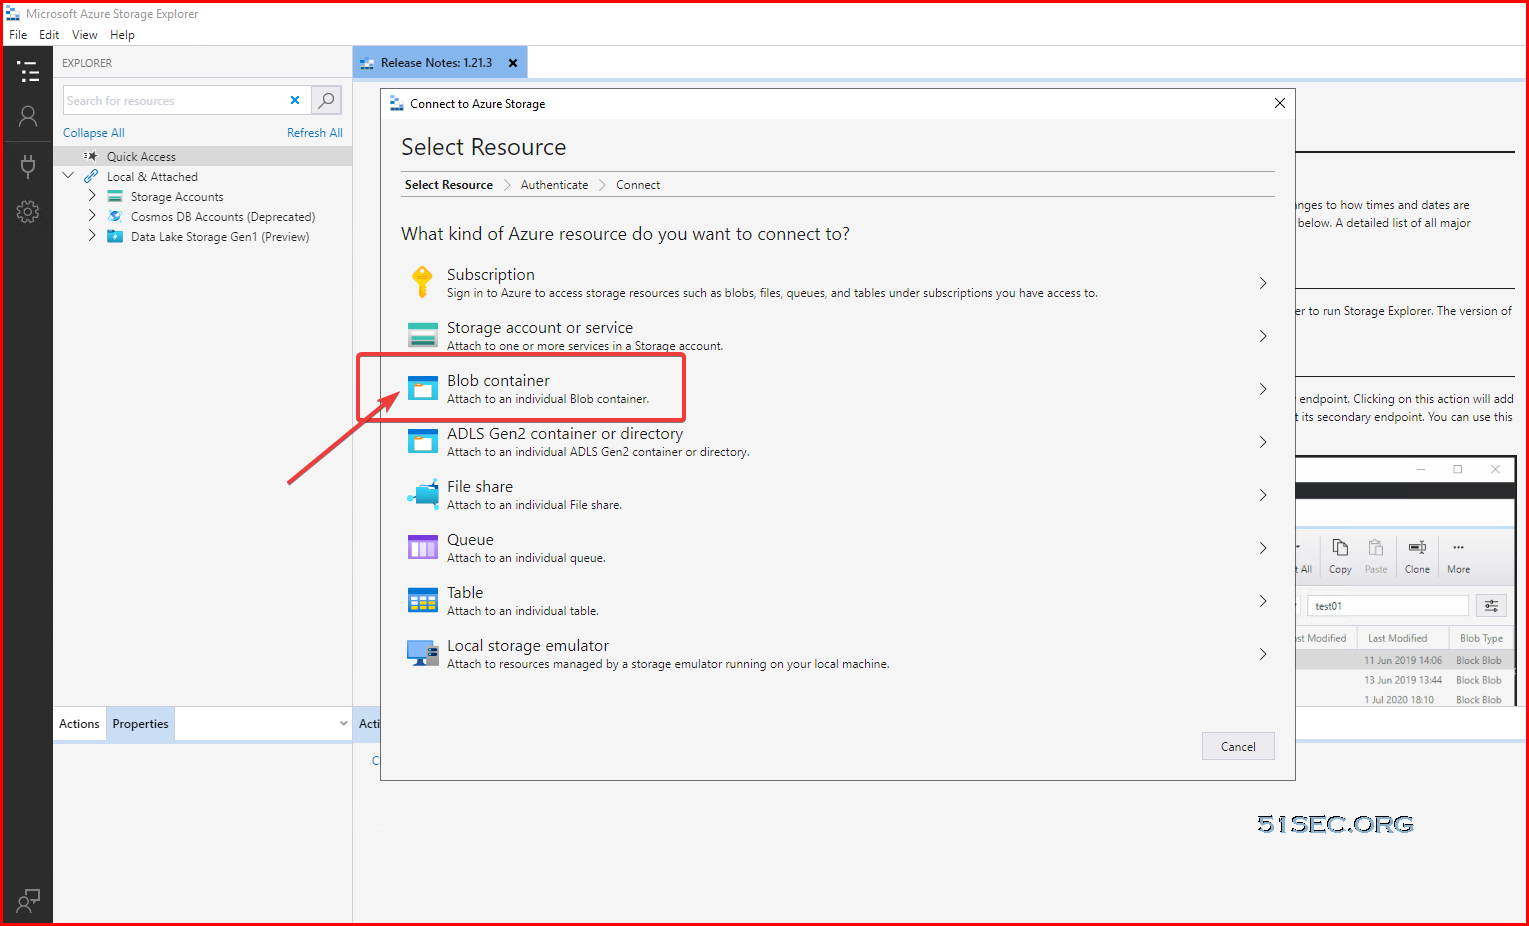
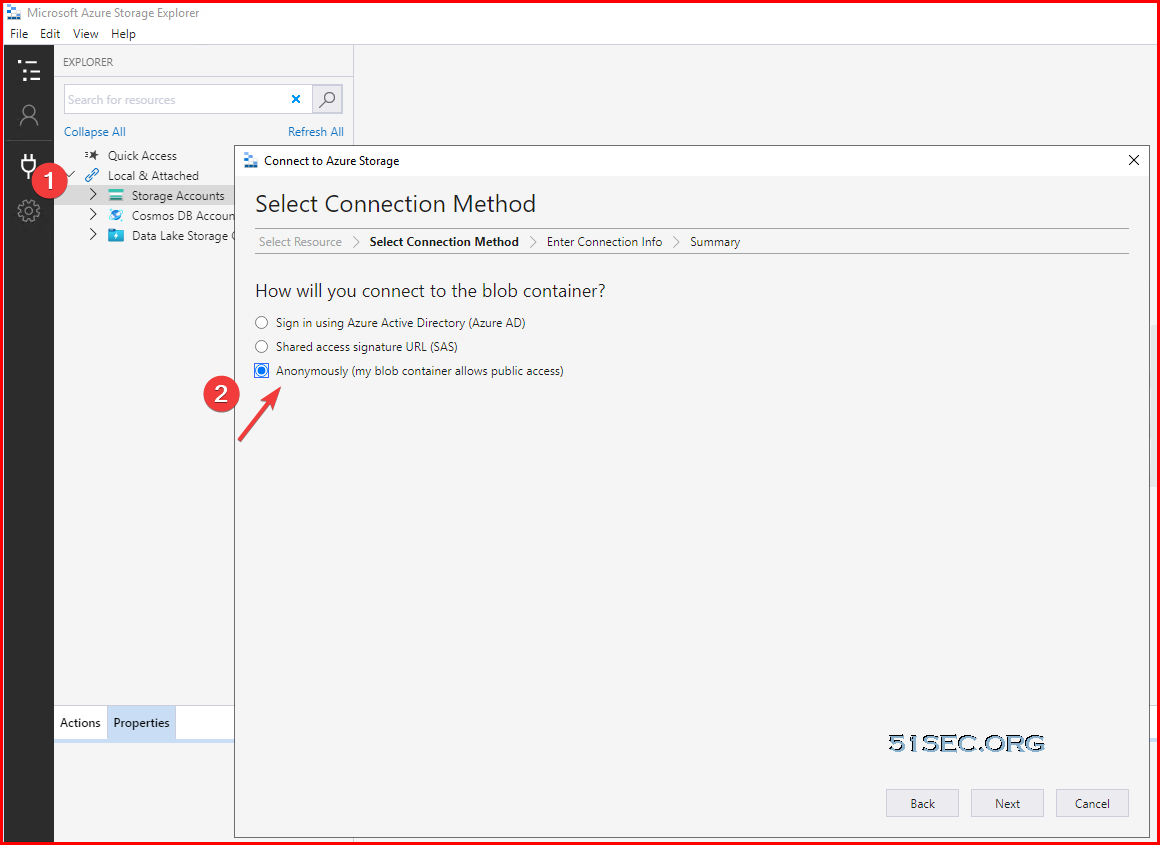
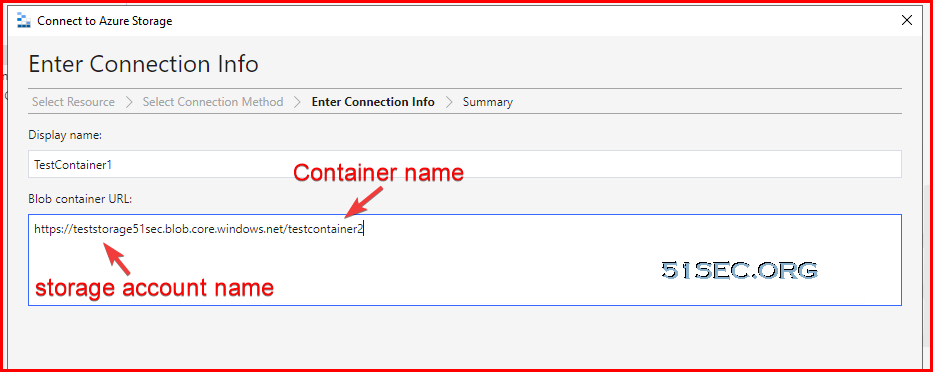
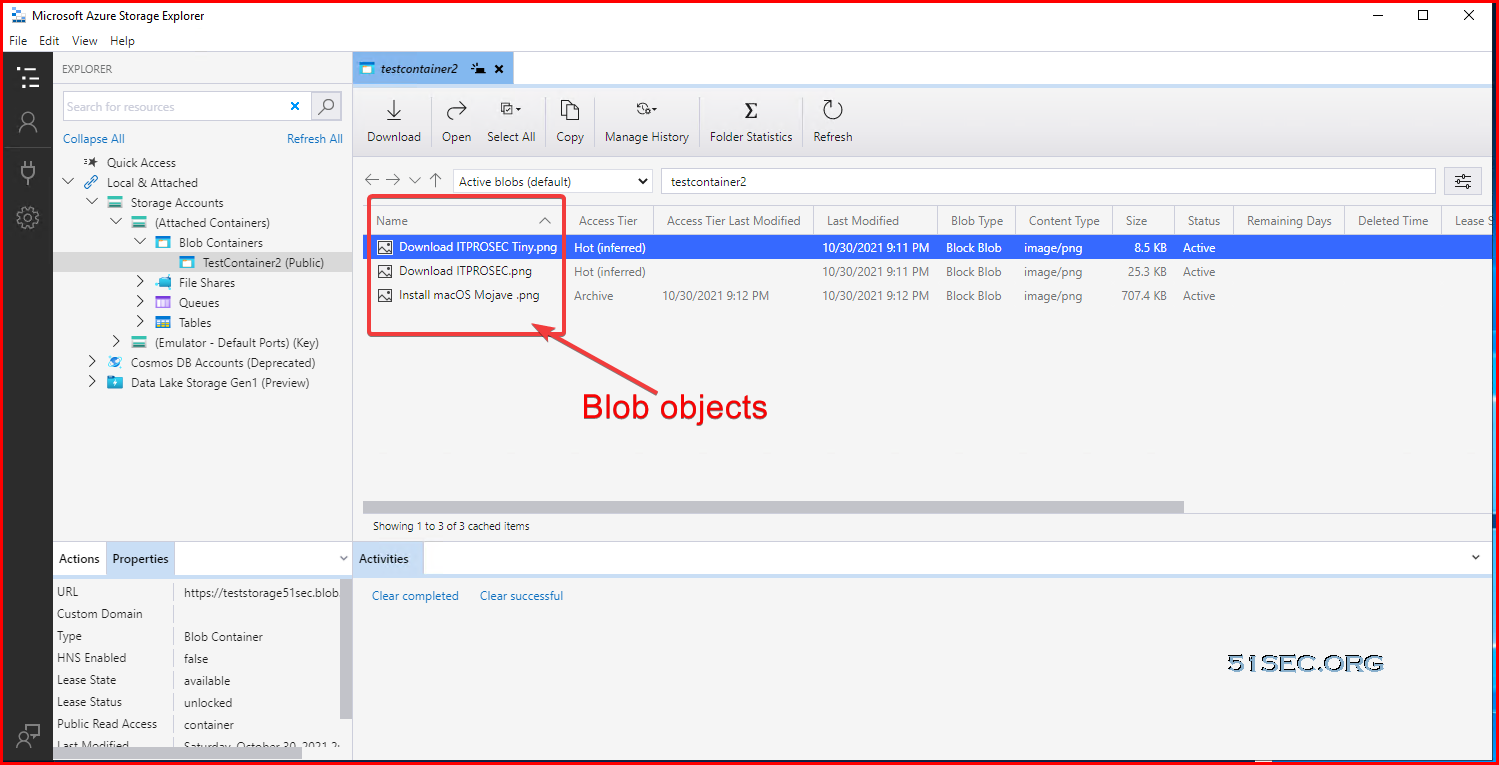
Connect to Blob container:
Anonymously access:
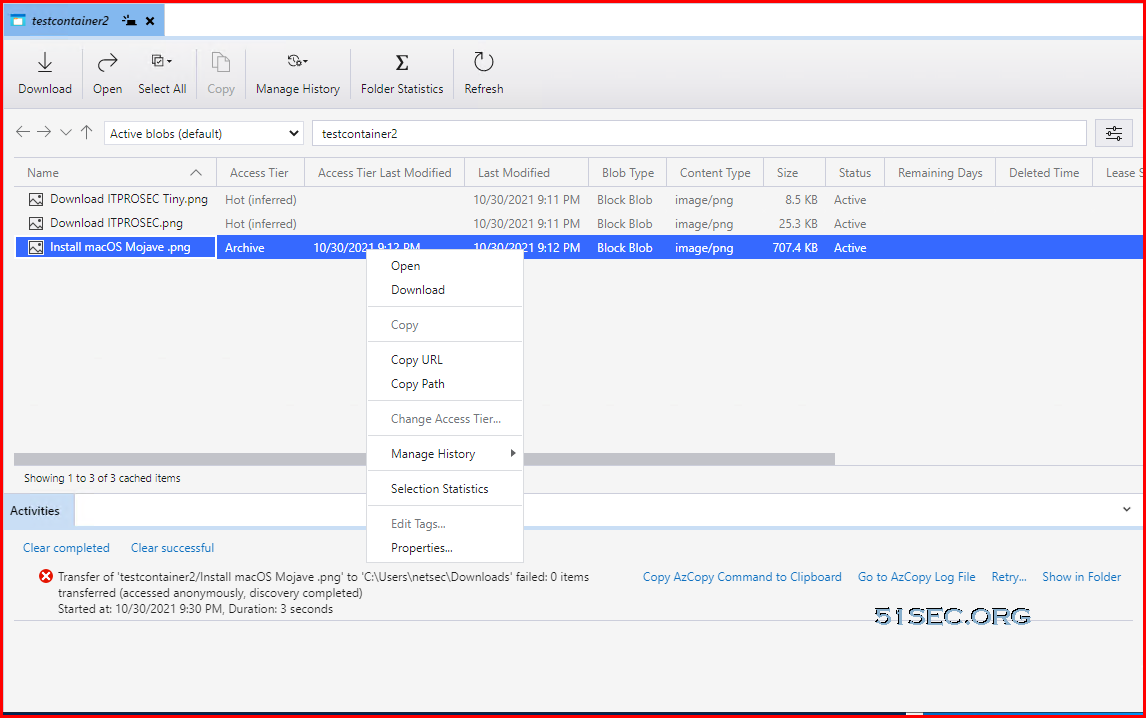
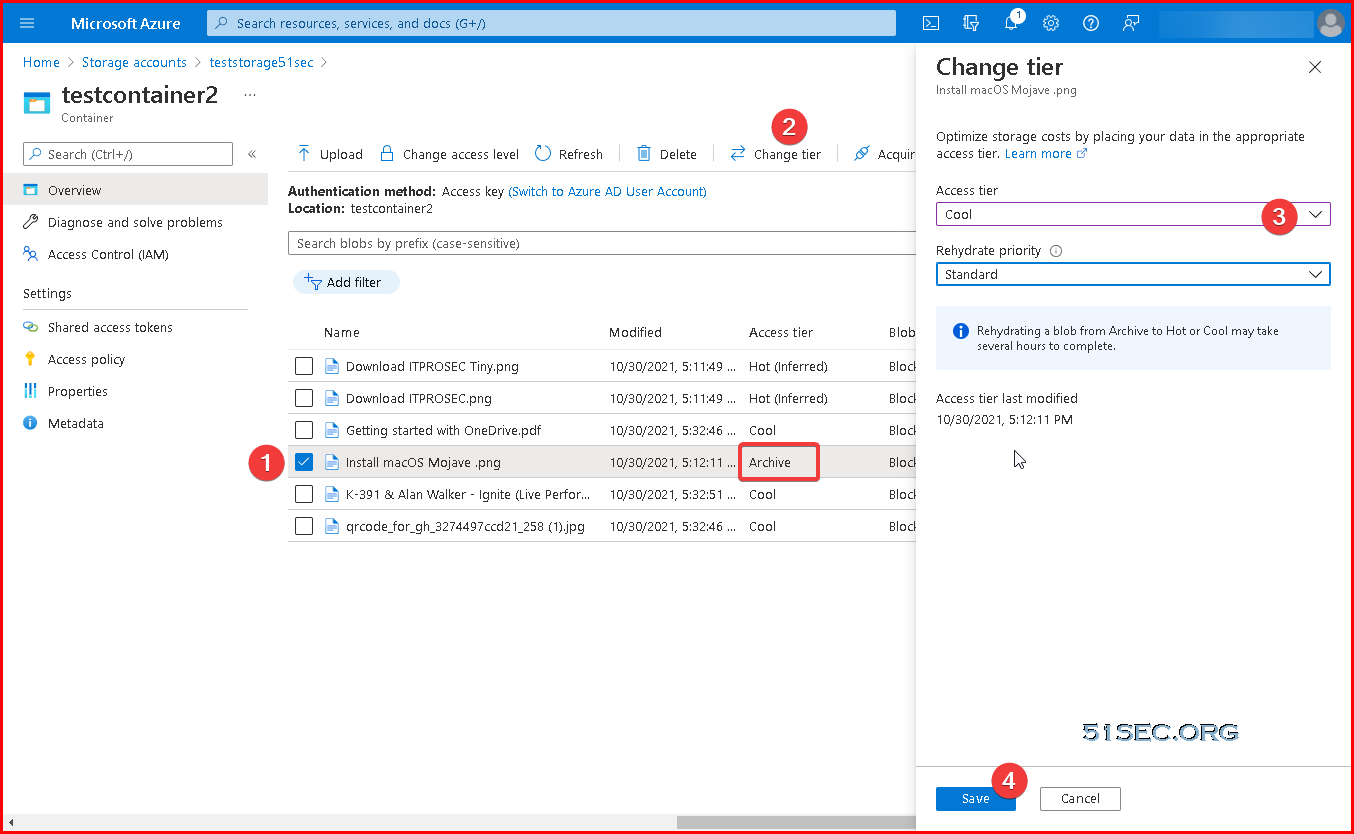
Download an Archived file will be failed, but hot/cool will be ok. Cool download has no delay based on testing.
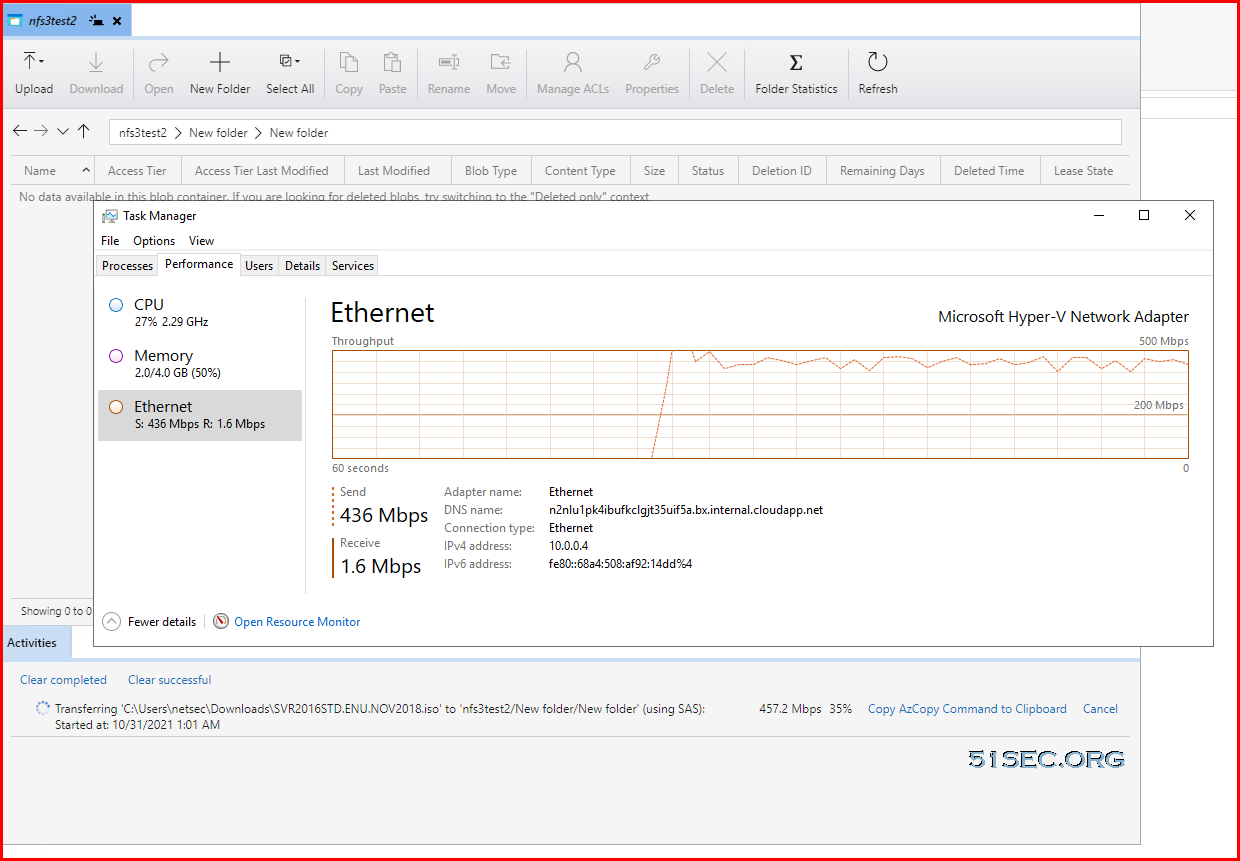
You can choose to upload to a new folder to create a folder under Blob container when uploading files. You also can choose multiple files to upload at one time.
Access Blob Storage Using Linux
References: Mount Blob storage by using the Network File System (NFS) 3.0 protocolMounting on Linux is simple, but you’ll need to have an NFS client install first. Some distros have this automatically installed, but others will need to install it.
Once it’s installed, create a mountpoint with mkdir. You may need sudo if you aren’t a root user or don’t have permissions.
mkdir /mnt/mystuff
After creating the mountpoint, mount the Storage Account with the mount command.
mount -o sec=sys,vers=3,nolock,proto=tcp testnfs3sec.blob.core.windows.net:/testnfs3sec/nfs3test /mnt/mystuff
Reference: Mount SMB Azure file share on Linux
Access Blob Storage in Windows
Mounting Blob Storage using NFS 3.0
Reference link: https://hovermind.com/azure-virtual-machine/mounting-blob-storage.html#points-to-be-noted
Enable cloud shell (https://shell.azure.com.) will cause a small charges since it will requires a storage account with a new resource group to store some information.
Requesting a Cloud Shell.Succeeded.
Connecting terminal...

Welcome to Azure Cloud Shell

Type "az" to use Azure CLI
Type "help" to learn about Cloud Shell


MOTD: Save files to $home/clouddrive for persistence across sessions

VERBOSE: Authenticating to Azure ...
VERBOSE: Building your Azure drive ...
PS /home/netsec>
PS /home/netsec> Register-AzProviderFeature -FeatureName AllowNFSV3 -ProviderNamespace Microsoft.Storage

FeatureName ProviderName      RegistrationState
----------- ------------      -----------------
AllowNFSV3  Microsoft.Storage Registering

PS /home/netsec>
PS /home/netsec> Register-AzResourceProvider -ProviderNamespace Microsoft.Storage

ProviderNamespace : Microsoft.Storage
RegistrationState : Registered
ResourceTypes     : {storageAccounts/encryptionScopes, deletedAccounts, locations/deletedAccounts, storageAccounts…}
Locations         : {East US, East US 2, West US, West Europe…}


PS /home/netsec>
PS /home/netsec> Get-AzProviderFeature -ProviderNamespace Microsoft.Storage -FeatureName AllowNFSV3

FeatureName ProviderName      RegistrationState
----------- ------------      -----------------
AllowNFSV3  Microsoft.Storage Registering


PS /home/netsec>
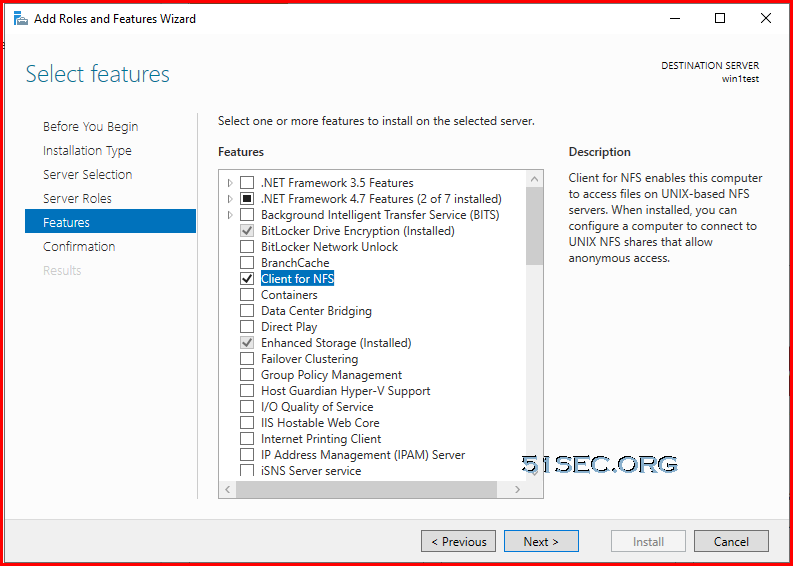
On your VM, install client for NFS.
New-ItemProperty -Path HKLM:\SOFTWARE\Microsoft\ClientForNFS\CurrentVersion\Default -Name AnonymousUid -PropertyType DWord -Value 0

New-ItemProperty -Path HKLM:\SOFTWARE\Microsoft\ClientForNFS\CurrentVersion\Default -Name AnonymousGid -PropertyType DWord -Value 0
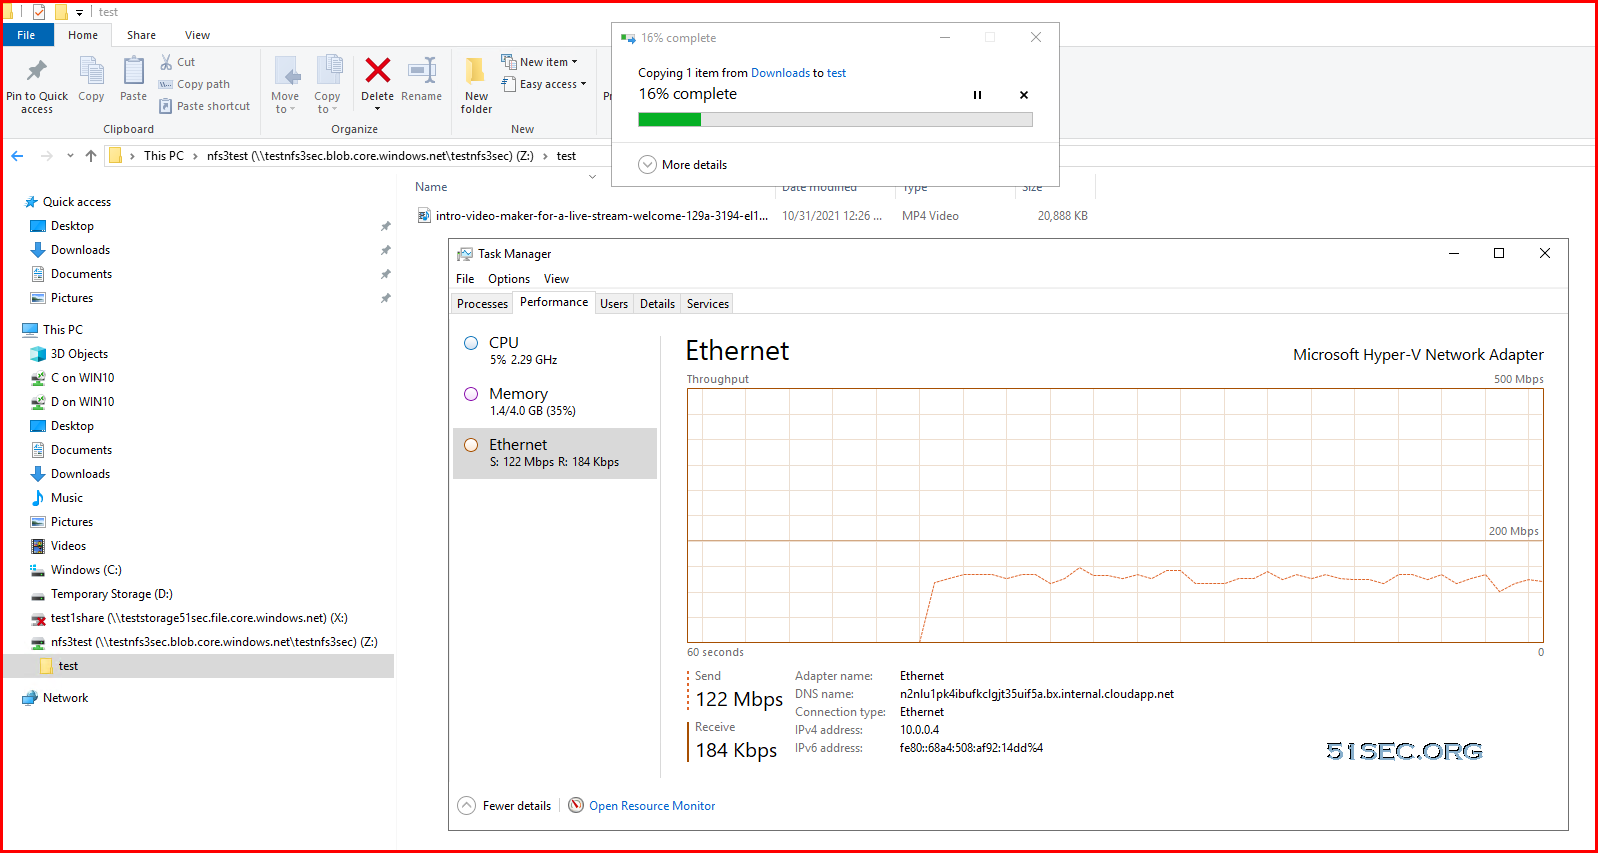
C:\Users\netsec>mount -o nolock testnfs3sec.blob.core.windows.net:/testnfs3sec/nfs3test *
Z: is now successfully connected to testnfs3sec.blob.core.windows.net:/testnfs3sec/nfs3test

The command completed successfully.

C:\Users\netsec>
Performance:
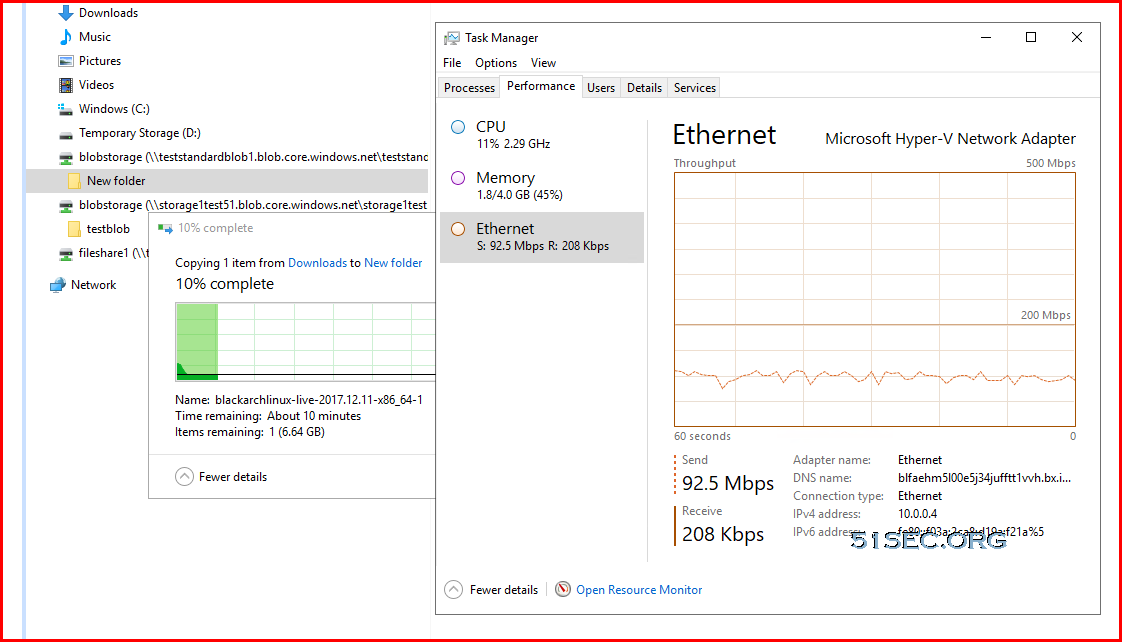
The uploading speed is about 120Mbps from local to mounted NFS share.
But when using Azure Storage Explorer, it can reach around 430Mbps.
Automatically Mount Local Drive to the Shared Server Folder upon System Startup
The next step is to automatically mount the shared folder in the Shared Server to your local drive upon system startup.Create a Script
Create a batch file and put it in C:\mount.bat.
Open the file in a text editor and enter the following command(s) that mounts the sessions-storage or manager-storage folder in the shared server, whose IP address is 10.0.10.230, This folder is configured when setting up your Shared Server Directory to a local drive name S:
Examples:
mount -o fileaccess=777 10.0.10.230:/sessions-storage S:mount -o fileaccess=777 10.0.10.230:/manager-storage S:Save and close the file when you are done.
Create a Task to Execute the Batch File at System Startup
Next, you will create a task from the Task Scheduler that will execute your batch file at system startup.
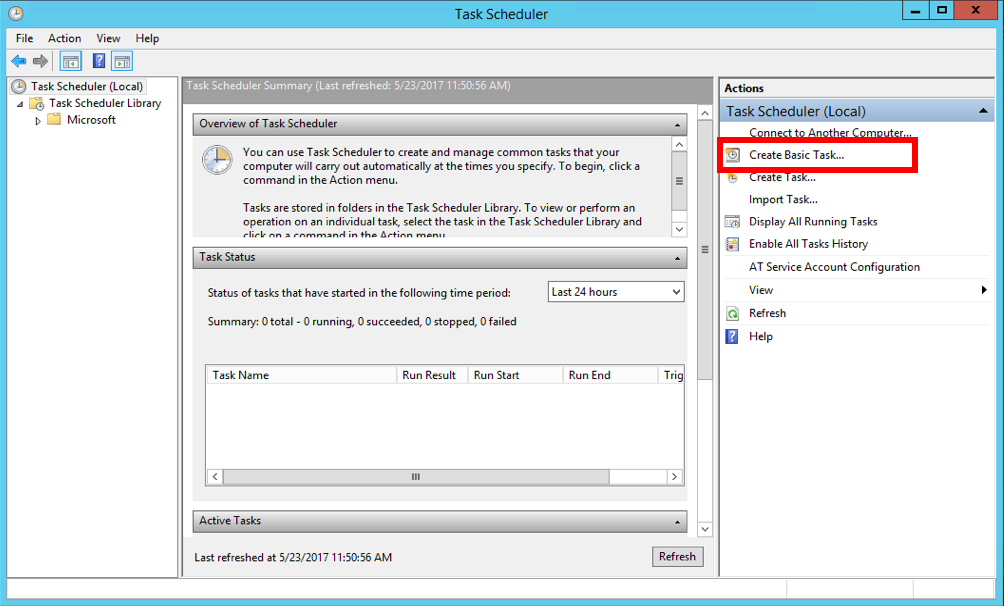
Open the Task Scheduler application and select Create Basic Task in the right panel.
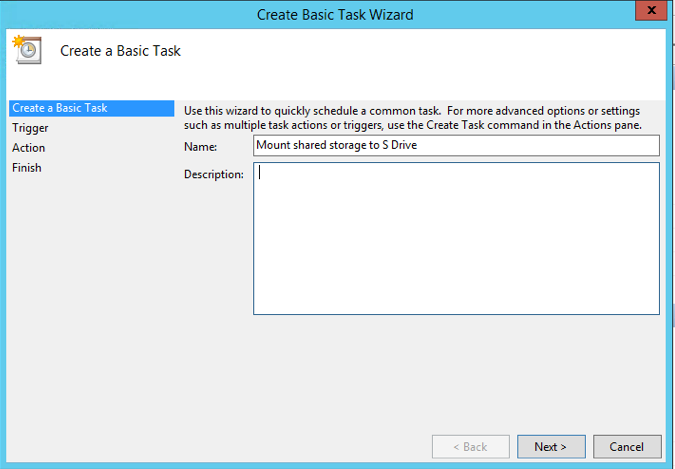
In Create a Basic Task screen, enter a name for our task, e.g. "Mount shared storage to S drive", then click Next.
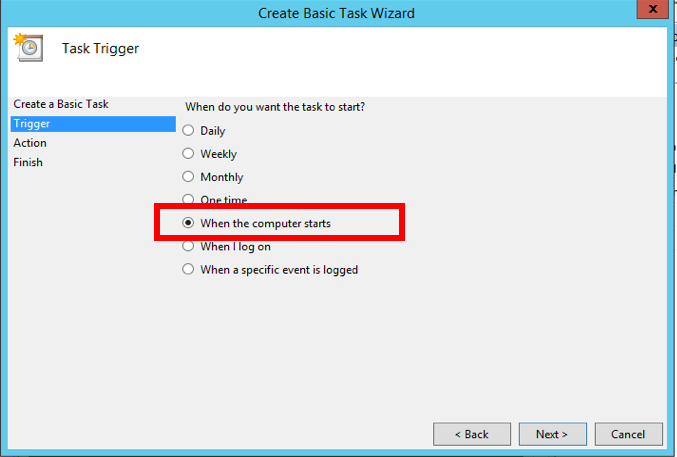
In Task Trigger screen, select option 'When the computer starts', then click Next.
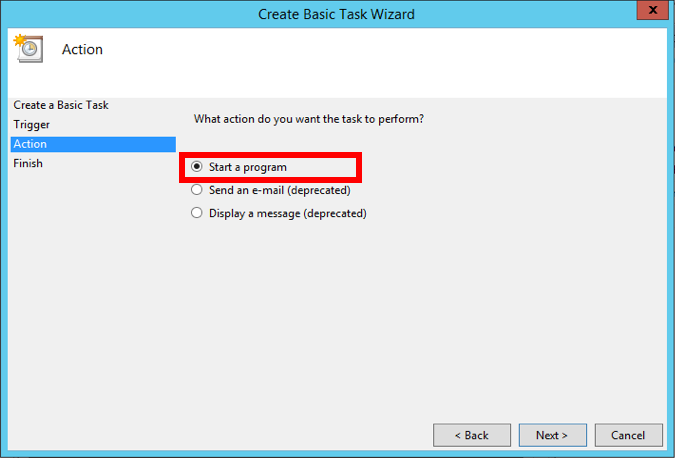
In Action screen, select the option Start a program and click Next.
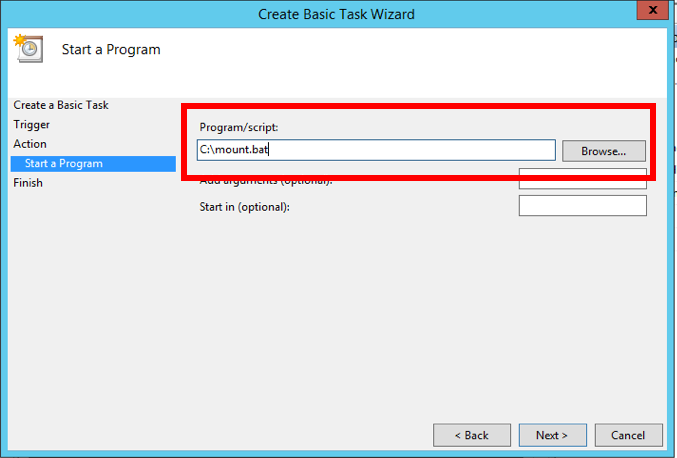
In Start a Program screen, enter 'C:\mount.bat' to Program/script field then click Next.
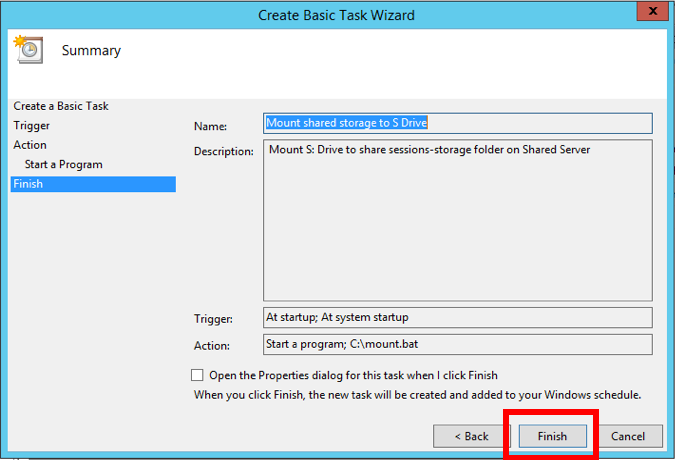
In Summary screen, click Finish.
Edit the Task Properties
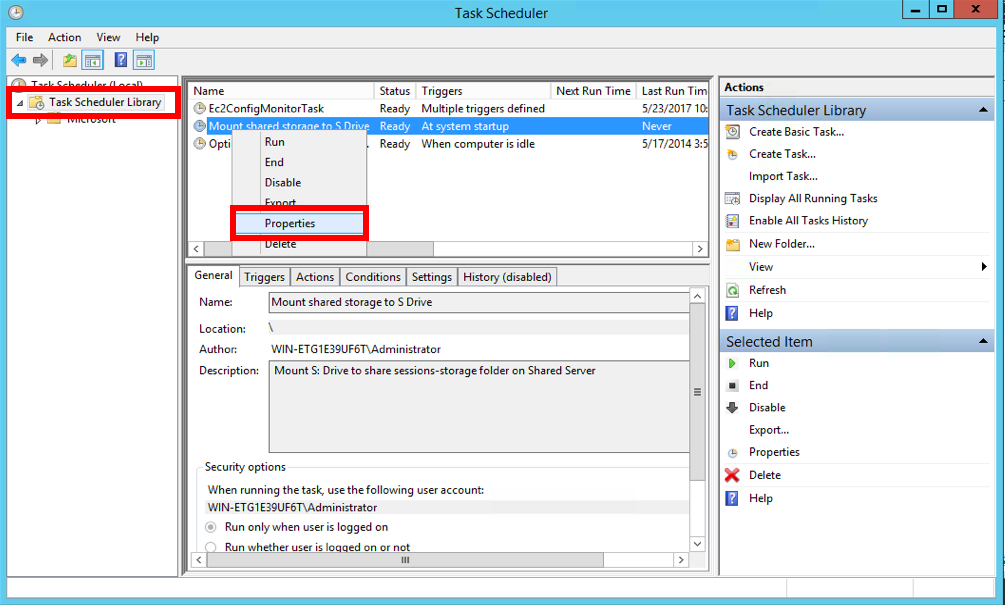
From Task Scheduler, select Task Scheduler Library folder in the left panel.
Look for your newly created task in the middle panel, and right click on it.
Select Properties in the popup menu.
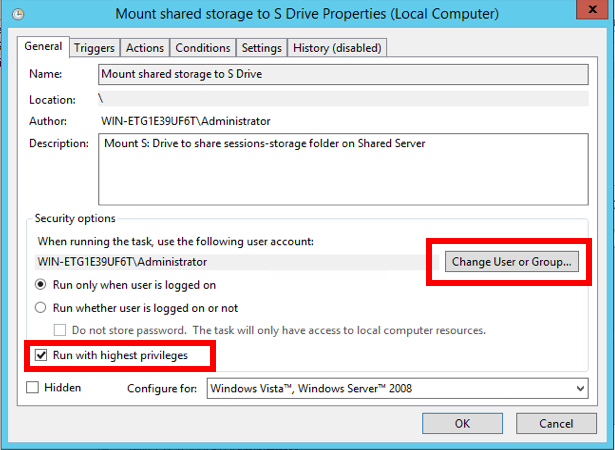
In the Properties window, perform following actions:
Check the checkbox 'Run with highest privileges'
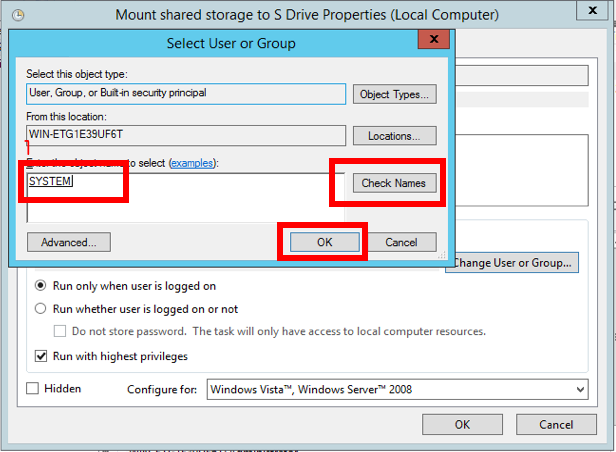
Click on 'Change User or Group...'
In the Select User or Group window, do the following:
Enter 'system' to the field Enter the object to select
Select Check Names
Select OK
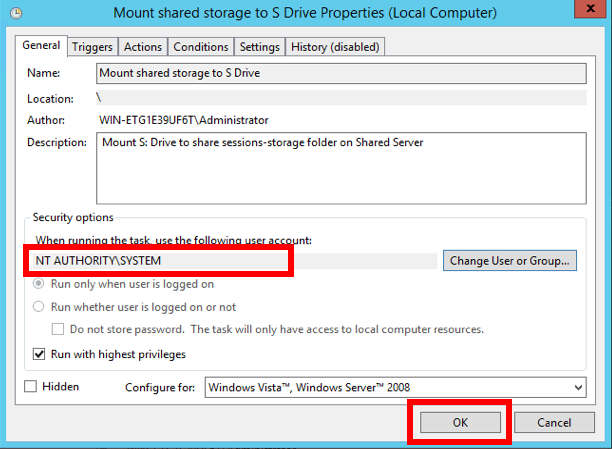
The property window now will look like below. Click OK to finish setting up the task property.
References
- Mount Blob storage by using the Network File System (NFS) 3.0 protocol.
- Tutorial: Use a Windows VM system-assigned managed identity to access Azure Storage
- Learn to transfer data from the Azure VM (Linux) to Blob Storage
- Known issues with Network File System (NFS) 3.0 protocol support in Azure Blob Storage



No comments:
Post a Comment